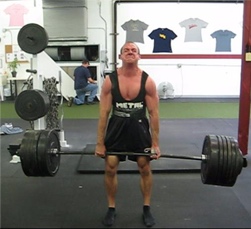
The squat is one of the most revered strength training exercises of all time, and the front squat is a popular variation on this compound lift. However, like many lifts, it's often performed incorrectly, and in many cases used by folks for whom it isn't a good fit. To that end, I thought I'd devote this article to outlining everything you need to know to be successful with the front squat.
What Makes the Front Squat Different?
A few primary factors differentiate a front squat from a traditional back squat.
First, the bar is positioned on the front of the shoulder girdle rather than on the upper back. In the process, an athlete is given a counterbalance to allow for a better posterior weight shift, which improves squat depth. If you need proof, check out your body weight squat, and then retest it while holding a ten-pound plate out at arm's length; most of you will improve substantially.
Second, because the arms are elevated (flexed humeri), the lats are lengthened. This is in contrast to the back squat, where the lats can be used to aggressively pull the bar down into the upper back and help create core stability. I firmly believe the lack of lat involvement is what accounts for the significant differences in loads one can handle in the front squat as compared to the back squat. However, "quieting down" the lats on the front squat is likely why athletes with such dramatic lordotic posture can often squat much deeper/cleaner with the front squat. Of course, if they have an excessive lordosis and anterior pelvic tilt, you may not want to squat them in the first place!
Third, the positioning of the bar in the front makes the front squat much more shoulder friendly than the back squat, assuming we aren't dealing with an acromioclavicular joint injury, which would be irritated by direct pressure of the bar. In the back squat, the externally rotated "rack" position poses problems for athletes with poor upper body mobility, and it actually reproduces injury mechanisms at the shoulder and elbow in overhead athletes like baseball players, tennis players, volleyball players, and swimmers.
Fourth, the upright torso angle of the front squat reduces shear stress on the spine. More forward lean equates to more shear stress, as the resistance is moved further away from the axis of rotation; just think of a see-saw where your lower back is the middle point and you'll catch my drift. Moving the load further out also increases risk of going into excessive lumbar flexion under compressive load. The front squat – even under heavier loads – keeps a lifter more upright, or else he’ll simply dump the bar; it's somewhat of a self-limiting strength exercise.
Fifth, because the load is positioned further forward than in a back squat, there isn't as much of a pre-stretch for the posterior chain, so the front squat will be more quad dominant than the back squat, which will engage more glutes and hamstrings. Of course, you can use front box squats to shuffle things up and get some variety, but we won't deviate from the point too much here.
Sixth, in the overwhelming majority of lifters, because of the upright torso angle and increased recruitment of quads relative to posterior chain, most lifters will use significantly less weight on the front squat than the back squat. All things considered, if you can achieve a comparable training effect with less external loading, you're dealing with what would generally be considered a safer exercise.
Contraindications
Some individuals simply aren't cut out for any kind of squatting, so before we even talk technique, it's important to start by separating these lifters out. Some common contraindications for squatting include poor tolerance to compressive loading (e.g., symptomatic lumbar spine disc injuries) and femoroacetabular impingement (this bony block at the hips makes it virtually impossible to squat without developing issues acutely and chronically).
Specific to front squatting, poor hip mobility, ankle mobility, core stability can be problematic, but perhaps nothing is as big of a buzzkill for front squatting as a kyphotic posture. As I demonstrate with my Quasimodo impression in this photo, it's impossible to get the elbows up when you're rounded over like a scared cat.
These are really just the tip of the iceberg in terms of potential contraindications, but they serve as examples of how we need to fit the exercise to the lifter and not vice versa. With that out of the way, let's talk...
Technique!
We'll start with the hand positioning, as it's the most hotly contested portion of the front squat technique debate. Only a video will do it justice:
When it comes time to unrack the bar, I cue the athlete to push the elbows up high and take air into the belly as they stand up the weight. This combination of "elbows up" (shoulder flexion) and "air in" prevents the bar from rolling - either because the arms are angled down or because the torso goes to mush as the rib cage comes down.
After the weight is walked out, the athlete should take a slightly outside hip width stance, with the toes angled slightly out. One of the biggest mistakes I see is that athletes go too wide with their stance, and the end result is that the knees have nowhere to go but in:
To piggyback on the "feet in, knees out" cue, I encourage athletes to think of "squatting between the knees, not over them." This seems to get folks to the right balance of "sit back" and "sit down," as an (Olympic) front squat will have more "sit down" than a back squat or box squat variation. Additionally, a regular back squat will be slightly wider in stance than a front squat for most folks, and a box squat will certainly be even wider.
"Elbows up" is a cue that resounds throughout the movement, and it's especially important in the bottom position, when the bar will want to roll the most. Regardless of the hand position you select, make sure the elbows are at or above the level of the bar at all times. One great drill for practicing is to simply unrack the bar hands-free and gradually build up loads. If you can get comfortable with this set-up, you'll always remember to think "elbows" and not "hands."
As you come out of the hole and accelerate toward lockout, make sure you don't get lazy as you enter the easy portion of the strength curve. This is where front squatting with chains can be very helpful; it educates you on how to accelerate right up to lockout, where the hips and knees extend fully simultaneously. If you don't have chains, try loading the last ten pounds of weight as 2.5-pound weights (two on each side). Position the clamp about an inch further out than it would normally be so that they can "clank" a bit. Your goal is to make the 2.5-pound plates rattle at the top of each rep. Finish with the glutes as you stand tall, and reset your breath before descending for subsequent reps.
Speaking of reps, stay away from doing high-rep front squats. Sets of six should be the maximum you do, as muscles involved in maintaining the "rack" position may fatigue early and compromise the safety of the exercise.
Equipment Considerations
There are three important equipment considers to take into account.
First, your shoes should have a subtle heel lift. It doesn't have to be an Olympic lifting shoe, but something that is totally flat to the ground won't work for the majority of folks. It'll take some tremendous ankle mobility to squat deep without a little lift - even if it's only a few millimeters. Front squatting (assuming an upright, Olympic stance) barefoot is probably not a great idea; I can count on one hand the number of people I've seen do it in good technique in the past 4-5 years since the barefoot craze took off. Minimalist shoes are fantastic, but not necessarily for deep, Olympic-style squatting. If you're rocking a Minimalist sneaker, you can always slide a five-pound plate under the heel.
Second, be careful with shirts made of "wicking" fabric. While they may be super comfortable, they do tend to allow the bar to slide a bit too much, especially if you're using a bar that doesn't have much knurling. A quick solution to this is to spread some lifting chalk around the collar and chest to help the bar grab the shirt a bit more - or you could just wear a different shirt.
Third, many front squat newbies will really struggle with the discomfort of the bar position as they're learning to the bar-in-front technique. While everyone ultimately adjusts to this discomfort (especially if they add some muscle mass to the area), one strategy to help athletes get by in the short-term is to just have them wear two shirts while they front squat. This extra layer of padding is subtle and won't change the technique of the exercise, but will make it more tolerable during the learning phase. You can taper an athlete off of it shortly thereafter.
Closing Thoughts
Squats aren't for everyone, but if you are going to squat, the front squat is one great option. Put these coaching cues and strategies into action, and you'll be front squatting safely and moving big weights in no time.
Looking for more detailed training tutorials like this, and a program in which front squatting is incorporated? Check out The High Performance Handbook, the most versatile strength and conditioning program on the market.
Sign-up Today for our FREE Newsletter and receive a four-part video series on how to deadlift!
My "random thoughts" pieces are some of my favorite writings that I've ever published, and today seemed like a good day to throw out some quick and easy ideas on how you can feel better, move better, lose fat, gain muscle, get strong, and - if you're super-motivated - take over the world. Here goes...
1. Get a good training partner.
There are random dudes you meet at the gym who provide a mediocre lift-off on the bench press here and there, and then there are dedicated training partners. There is a big difference. A good training partner will tell you to get your act together and train hard when you're slacking off, or even hold you back when your body is banged up, but you're stupidly trying to push through it. It's guaranteed accountability, motivation, expertise, safety, competition, and all-around awesomeness. To be honest, I often wonder if most people get the best results working with a trainer/strength coach for these factors more than the actual expertise the fitness professional provides!
2. Make your bedroom a cave.
One of the best investments my wife and I made when we bought our new house were reinforced window shades for our bedroom so that very little light could get through when they were down. They make a dramatic difference in terms of how dark you can make your room at night (especially if you have street lights near your residence) and were 100% worth the extra cost, as compared to regular shades.
Even if you don't want to spend the extra few bucks on souped-up shades, though, you can still get some of the benefits of "cave sleeping" by blocking out light from cell phones, alarm clocks, and - if you're a frat boy - bright green neon signs of your favorite beer in your dorm room. Also, do your best to shut the TV and computer off at least thirty minutes before you hit the sack as well, as it'll give your brain time to wind down and transition to some deep, restful sleep.
3. Take Athletic Greens.
I've always been a non-responder to supplements. As an example, I never gained an ounce when I started taking creatine in 2001, and never noticed a huge difference in sleep quality when I started taking ZMA. Still, I pretty much trust in research and go with these supplements, plus mainstays like fish oil and Vitamin D and assume that they're doing their job. It's interesting how some of the most essential supplements we take are the ones where we might notice the most subtle difference, isn't it?
Anyway, in 2011, I added Athletic Greens to this mix. I look at it as whole food based "nutritional insurance" use it in place of my multivitamin. I think it's solid not only as a greens supplement (which, incidentally, doesn't taste like dog crap), but also because it directly improves gut health to improve absorption of micronutrients. With loads of superfoods, herbal extracts, trace elements, antioxidants, and pre- and probiotics, I could tell that it would be something that would decrease inflammation and improve immunity (something I've viewed as increasingly important with each passing year as life has gotten more stressful with the growth of Cressey Performance).
Interestingly, one of our long-time athletes who is now playing baseball at a highly ranked D1 university, started taking Athletic Greens after we chatted about it this summer, and he sent me this note:
Hey Eric, thanks for the recommendation on Athletic Greens. I love the product! I have not gotten sick once since I started taking it 4 months ago, and my body feels better than ever. This is the first semester I haven't gotten sick. Hope all is well!
I guess I'm not the only one who likes it! Check it out for yourself here.
As an aside, they do a pretty cool combination where you can get greens, fish oil, and vitamin D all at once at a great price, and the fish oil is excellent quality. We have several athletes who get everything in this one place for convenience.
4. Go split-stance.
Last week, in my popular post, Are Pull-ups THAT Essential?, I included the following video of forearm wall slides at 135 degrees, a great drill we like to use to train upward rotation, as the arms are directly in the line of pull in the lower traps. With this exercise, we always cue folks "glutes tight, core braced" so that they don't just substitute lumbar extension in place of the scapulae moving into retraction/depression on the rib cage.
Unfortunately, these cues don't work for everyone - particularly those who are super lordotic (huge arch in their lower back). A great "substitute cue" for these folks is to simply go into a split stance, putting one foot out in front of the other (even if it's just slightly). As you have probably observed in performing single-leg exercises like lunges and split-squats, it is much harder to substitute lumbar extension for hip extension than it is with bilateral exercises like squats and deadlifts. Fortunately, the same is true of substituting lumbar extension for scapular movement on the rib cage. So, if you're struggling with the exercise above, simply move one foot out in front of the other and you should be golden.
5. Get some assessments done.
Imagine you were about to embark on a cross country trip with a great vacation in mind in, say, San Diego. However, I didn't tell you where you were starting the journey. While you might get to where you want to be (or at least close to it), it'd make the trip a lot more difficult. You'd probably blow a bunch of money on gas, sleep in some nasty motels in the middle of nowhere, pick up an awkward hitchhiked who smells like cabbage, and maybe even spend a night in a Tijuana jail along the way. Not exactly optimal planning.
A strength and conditioning program isn't much different than this cross-country trip. If you don't know how your body works - both internally and externally - you need to learn before you subject it to serious stress. Get some bloodwork done to see if you have any deficiencies (e.g., Vitamin D, iron, essential fatty acids) that could interfere with your energy levels, ability to recover, or endocrine response to exercise. Likewise, consult someone who understands movement to determine whether you have faulty movement patterns that could predispose you to injury. I think this is one reason why Assess and Correct has been our most popular product ever; it gives folks some guidance on where to start and where to go. Otherwise, the strength and conditioning program in front of you is really just a roadmap, and you don't know where the starting point is.
These are just a few quick thoughts that came to mind today, but I'll surely have many more in the follow-ups to this first installment. Feel free to post some of your own ideas in the comments section below, too!
Sign-up Today for our FREE Newsletter and receive a four-part video series on how to deadlift!