Home Posts tagged "mobility exercise"

The Best of 2017: Guest Posts

I've already highlighted the top articles and videos I put out at EricCressey.com in 2017, so now it's time for the top guest posts of the year. Here goes…

1. Is a Calorie Really Just a Calorie? - Brian St. Pierre tackled this hot topic in the nutrition world and (unsurprisingly) it generated a lot of buzz.

2. Should You Even Stretch? - Dean Somerset always comes through with great content on the corrective exercise side of things.

3. 5 Tips for Improved Client Relationships - Brett Velon was one of the best interns we've ever had, and it had a lot to do with his amazing ability to build rapport with clients so quickly. He shares some of his tips here.

4. Are You Training Mobility or Just Mobilizing? - Frank Duffy takes a closer look at ways to improve your mobility training.

5. When Precision Tops Effort - John O'Neil discusses the importance of knowing that not all exercises need to be treated like PR deadlifts.

I'll be back soon with the top strength and conditioning features from 2017.

Sign-up Today for our FREE Newsletter and receive a four-part video series on how to deadlift!

Name
Email
Read more

Are You Training Mobility or Just Mobilizing?

Today's guest post comes from Cressey Sports Performance coach, Frank Duffy. Enjoy!

The word “mobility” gets thrown around a lot in the fitness industry, and rightfully so. However, the context in which we use it often doesn’t correspond properly with the movements we prescribe to our clients.

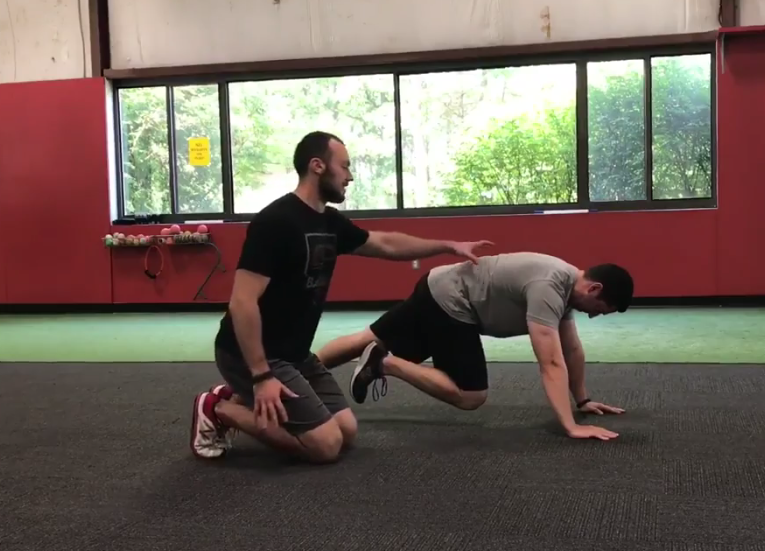
In order to appreciate what true mobility training is, I think it’s important to first understand what it isn’t. Wrapping a band around a squat rack and stretching your upper back might feel great and improve passive flexibility when done for long enough periods of time, but improvements in active mobility will not be an outcome. This goes for practically any drill you see within a warm-up prior to a training program. I prescribe a lot of mobilization drills to our athletes where the primary intent is to get them feeling good for their training session. I love Split-Stance Kneeling Adductor Mobilizations, but I’m not going to sit here and say that – by themselves – they are a great way to improve long-term hip abduction mobility.

When training to improve joint mobility, the goal is to improve active range of motion. Mobility, just like any training stimulus (strength, power, muscular endurance, aerobic capacity, etc.) we’re looking to improve follows the same principles of progressive overload in order to elicit an adaptation. Connective tissue, whether it’s a muscle, tendon, ligament, capsule, or bone (to name a few), needs to be placed under mechanical stress to remodel the tissue being addressed.

When implementing the Functional Range Conditioning (FRC) system, I like to expose new clients to Controlled Articular Rotations (CARs) in order to help them understand how to properly train for long-lasting joint range of motion improvements. While CARs will not directly improve our joint mobility, they do provide us with four main benefits that I’ve listed below.

1. Assessment: CARs are a great tool for assessing the overall ranges of motion at each joint. They allow us to move each joint throughout its full range of motion under voluntary muscular contractions. When active mobility is restricted and joint function is poor, CARs also allow us to determine what our mobility training goals should be.

2. Mechanoreception: The capsule of our joint articulations is home to a high concentration of mechanoreceptors. When stimulated through end-range movements, mechanoreceptors supply the Central Nervous System with afferent feedback with information about the joint’s position in space.

3. Injury Prevention/Training Stimulus: Because CARs are performed under active contractions, the force applied to the surrounding connective tissue is below the threshold for injury (amount of force a tissue could safely absorb). When done at high enough intensity via voluntary muscular contractions, CARs could also provide a strength training stimulus for force production at the targeted joint.

4. Maintenance of Joint Range of Motion: The primary goal of executing CARs daily is to move our joints throughout their full range of motion under some degree of force. This will allow us to maintain our current ranges over time due to consistent exposure.

As mentioned above, CARs are a great way to assess the quality of each joint because they isolate the articulation being moved. Of course, our joints move interdependently with virtually every movement we perform. However, if a joint doesn’t work effectively on its own, it’s not going to work well in a global system under load. A sure-fire way to induce injury is to repetitively load a position when you haven’t prepared the involved joints for force absorption.

To break out even further, the “sticking points” of your CARs allow you to determine the appropriate joint angles at which to perform isometric contractions for both the progressive (lengthened) and regressive (shortened) tissues. By figuring out your active range of motion limitations, you’re able to create positional isometrics to learn how to expand these ranges further.

With individuals that present osseous restrictions like Femoroacetabular Impingement (FAI), I still recommend CARs on a daily basis. Regardless of structural orientation, it’s important to move through whatever active range of motion you currently own. As cliché as it sounds, if you don’t use it, you lose it. However, if CARs elicit pain, there’s an underlying issue that should be referred out to an appropriate rehabilitation specialist. Cranking a joint through a painful range of motion and hoping it will get better is just a recipe for further irritation – and an articulation that continues to function at less-than-optimal quality.

Whether you’re the most nimble yogi on the planet or a powerlifter that’s as stiff as a board, you should always seek ways to expand and control your mobility. Remember, mobility always comes back to active range of motion. With this in mind, it’s important to understand that there’s no such thing as having “too much” mobility. The more range you can control, the better off you’ll be.

If you’re interested in learning more or finding a provider near you, check out the following links: FR/FRC and Kinstretch.

About the Author

Frank Duffy is the Coordinator of Strength Camps at Cressey Sports Performance-Massachusetts. He is a Functional Range Conditioning Mobility Specialist (FRCms) and Kinstretch Instructor. You can contact him via email at frankduffyfitness@gmail.com, check out his website, and follow him on Instagram.

Read more

10 Tips for Making Mobility Work with Your Schedule

I received the following inquiry via email the other day, and thought it might make for a good Q&A post:

I've come to the unfortunate realization that 15 years of sitting at a desk - combined with the simple fact that I'm almost 40 - have left me severely lacking in mobility. And, it's something I now want (and need) to really address. However, I'm also a realist and know that with a busy work and family schedule, getting to the gym is hard enough - but adding a lot of mobility work on top of that could be really challenging. So, I'm wondering what the best way to efficiently tackle this problem is? Should I do a little bit each day? Is it better to go to a yoga class 1-2 times per week? Or something else? I'd like to make some positive changes, but ideally without completely overhauling my weekly schedule. Thanks for any direction you can provide.

The short answer to this question would be a blunt one:

[bctt tweet="If it's really important, make time instead of finding time."]

That wouldn't make for much of an educational blog, though, so let's explore this in more detail. Here are ten things I'd consider if you'd like to really dedicate yourself to improving your overall mobility as efficiently as possible.

1. Frequency is everything.

Remember that - simply stated - mobility is your ability to reach a certain position or posture. It's different than flexibility in that mobility necessitates stability within a range of motion, not just the range of motion of a joint (or series of joints). In other words, you need motor control to have motor control.

Think back to when you were learning to ride a bike. Did you go out and try for 5-6 hours every Saturday morning, or did you put in several runs every day for a few weeks? If you're like most people, it was definitely the latter option.

[bctt tweet="Frequent exposure is key for motor learning, and you can't improve mobility without motor control."]

What does that mean in the context of mobility work? You need to do something every day - and possibly even multiple times per day.

For most folks, a quality pre-training warm-up is an important first step. If you look at my High Performance Handbook as an example, each pre-training warm-up consists of about five minutes of foam rolling and ten mobility drills that should take about ten minutes total.

HPH-main

2. Find new planes and ranges of motion in your strength work.

Most training programs are very sagittal plane (front-to-back) dominant. In other words, a lot of exercisers do very little in the rotational (transverse) and side-to-side (frontal). While you do have to do work in these planes during single-leg work, that doesn't mean much for actually taking them close to their end-range of mobility. Simply adding in some lateral lunges to your warm-ups and strength work can go a long way.

Eric-Cressey-Plate-Slide-576

If you're looking for more examples, check out this detailed article of mine: 7 Ways to Get Strong Outside the Sagittal Plane.

3. Sign up for classes if you really need the accountability or the instructor is absolutely fantastic.

Yoga and Pilates can be absolutely fantastic tools for helping you to improve your mobility if:

a) They improve your accountability so that you're more likely to actually make this a priority.

b) You have an outstanding instructor that both motivates you and teaches you about how your body works.

These options can also be terrible approaches if you have unqualified instructors or attending them absolutely destroys your schedule - and therefore becomes a burden more than a blessing.

4. Mix in a little work at night before bed.  

This piggybacks on the aforementioned "frequent exposures" theme. I know of a lot of people who'll do a bit of foam rolling and stretching at night while watching TV or getting ready for bed. Anecdotally, it does seem to help some people unwind - possibly by kicking the parasympathetic nervous system on (especially if combined with a good focus on breathing during this work). If getting in some stretching and rolling before bed doesn't exactly thrill you, just pick 1-2 high priority drills and do them. Or just stretch out your calves while you're brushing your teeth! 

5. Break up prolonged periods of immobility.

Each spring, I drive from Florida to Massachusetts. Then, in the fall, I drive back to Florida. It's a lovely 23 hours in the car over two days.

The first time I did it, I tried to be a cowboy and just plow through it with as few stops as possible. My hips hated me for about three days after the trip was done.

Since then, I make sure to stop every 2-3 hours. In fact, on my ride back this spring, I even stopped twice to train along this journey. I felt dramatically better in the days that followed.

I think you can extend this logic to how we break up our days, too. If you have to be at a computer for the majority of the 9am-5pm work day, try to get up and move around every 20-30 minutes. Walk to get some water, or do a doorway pec stretch.

1-armDoorwayPec

It's a lot easier to do a little to maintain your mobility than it is to lose it and try to get it back.

6. Incorporate a bit more unilateral work.

When you take a lifter who's never done much single-leg work and start incorporating these unilateral movements, good things always seem to happen. I suspect that it has to do with the fact that a lot of these individuals are actually extending their hips past neutral for the first time in years, but I doubt that's the only mechanism.

To be clear, this doesn't mean that the hardcore squat/deadlift enthusiasts need to drop (or even tone down) these movements. It just means that it'd be a good idea to work in some more single-leg drills to the warm-up period, and to do some as an assistance exercise. They don't need to be loaded like crazy, either, particularly early-on. It's not uncommon to see groin strains (or very pronounced soreness) when someone incorporates single-leg work to a previously 100% bilateral program, so incorporate them gradually in terms of loading and volume. 

7. Be patient and don't skip steps.

Getting transient (quick) improvements to range of motion isn't particularly difficult. You can get that from manual therapy, increased body temperature, or "tricks" to the nervous system. After these initiatives, we need to incorporate some stability training to make these changes "stick."

They won't magically improve dramatically from one session to the next, though. In fact, you may only hold 5% of that change from one session to the next - and that's why you need to stay patient and persistent with these drills over an extended period of time to see pronounced results.

With that said, it's important not to skip steps in this process. Just because your squat pattern improved a little doesn't mean you're ready to sink a 500-pound front squat to the "butt-to-heels" position the right way. And, just because you experienced subtle improvements to your active straight leg raise doesn't mean that you're ready to run a sub-10-second 100m dash. Own the changes before you try to challenge them in more chaotic environments.

8. Manage your breathing.

We'll keep this one really simple and watered-down:

Inhale = tension = stress

Exhale = relaxation = destress

If you're holding your breath while doing your mobility drills, stop! You're just stretching your lats, not attempting a 700-pound deadlift. Control your breathing, and think about fully exhaling at the lengthened position to give your system a chance to perceive it as a "new normal." The yoga folks have been preaching this for thousands of years, but us meathead strength and conditioning coaches have only started to figure it out in the past decade or so.

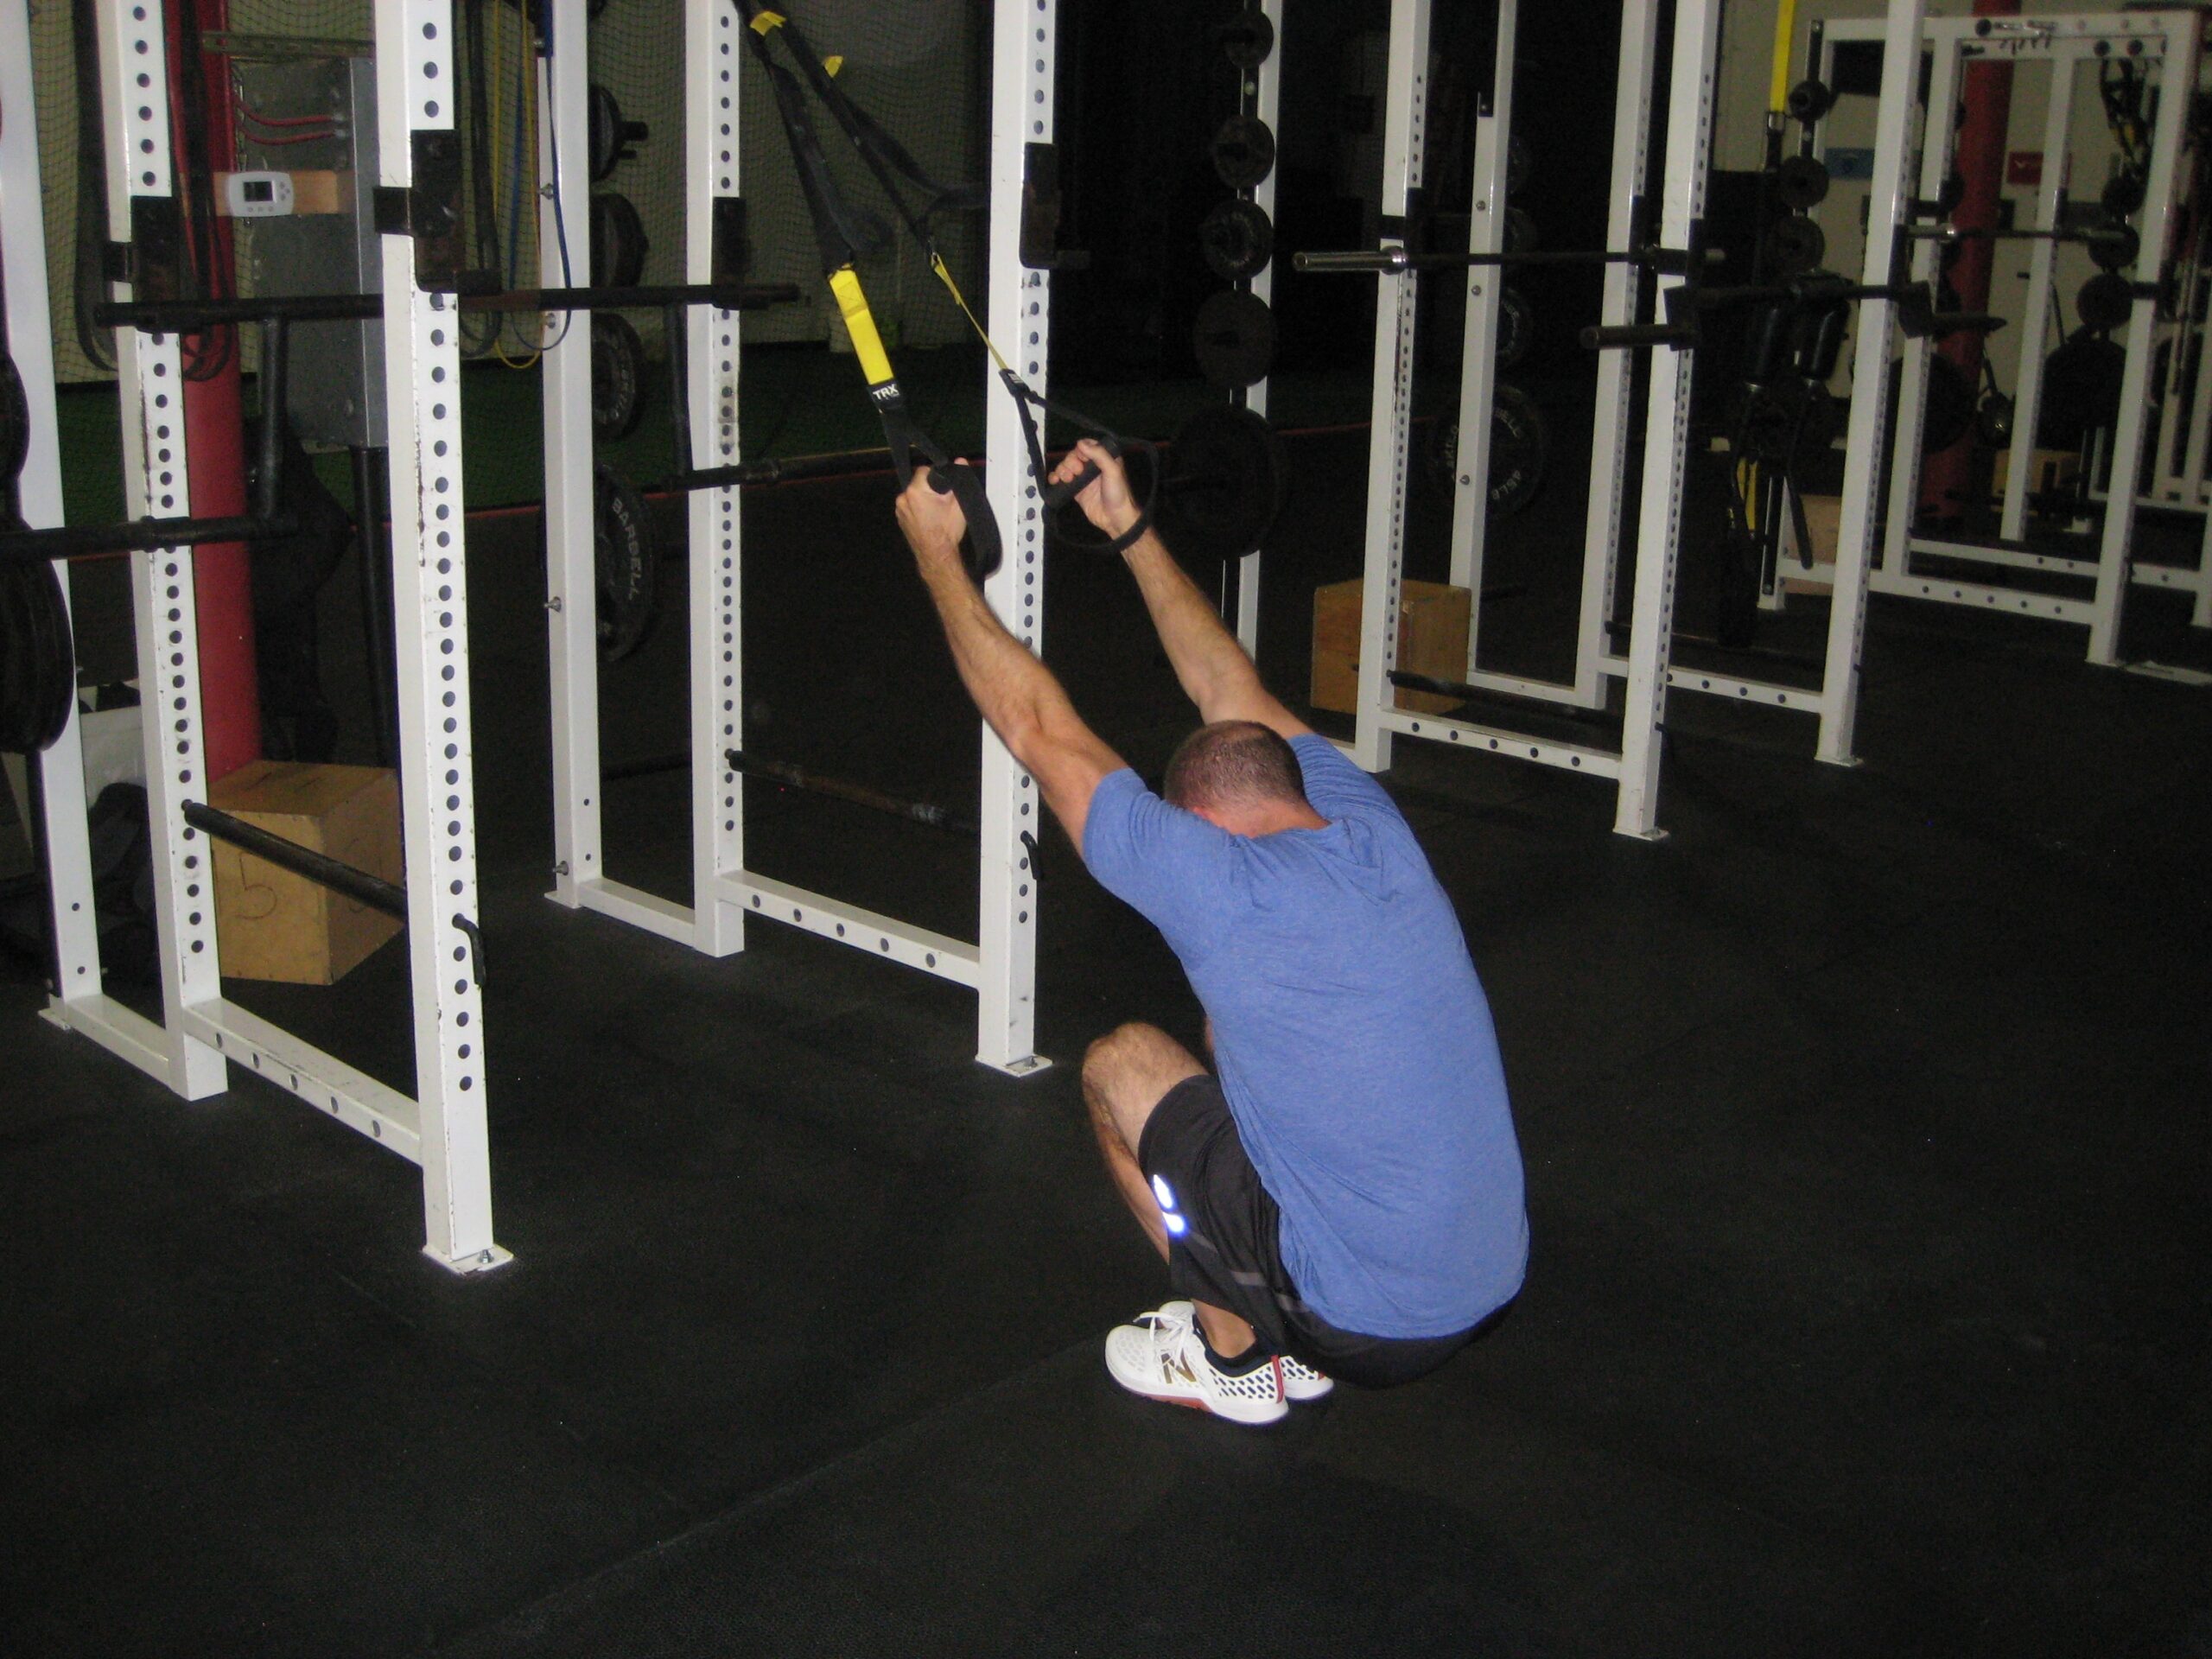
One drill I love for teaching this is the TRX deep squat breathing with lat stretch. Just sink down into this bottom position and exhale fully on each breath. Give it a "two-one-thousand" count before inhaling again. I usually program five breaths per set.

TRXDeepSquatBreathingWithLatStretch

9. Choose comprehensive mobility drills.

If you only have 10 minutes per day to devote to improving your mobility, you are best of focusing on drills that provide plenty of bang for your buck. In other words, you want drills that challenge multiple joints and planes of motion at the same time. Here are a few good options as examples:

10. Balanced programming and optimal technique help to improve mobility.

Sometimes, the best thing you can do is "audit" your programs and training technique to see if they're pushing you further into your mobility deficit. Maybe you're benching too much and rowing too little? Or, perhaps it's been a lot of squatting and not enough deadlifting? Could it possibly be that you've been board pressing a ton and omitting full range-of-motion benching that could actually be really helpful for your shoulder? There are countless programming pitfalls into which one can fall, but you'll never identify them until you take a step back to review what you've been doing.

Moreover, crappy technique under load reinforces bad patterns and loss of mobility. Additionally, it can turn soft tissue and neuromuscular control restrictions into joint restrictions (laying down bone that shouldn't be there). You can't just fix reactive changes to the joint with stretching, either. Train hard, but train smart and with solid technique.

Wrap-up

These are only ten thoughts off the top of my head, and there are surely many more. At the end of the day, though, most of the mobility improving strategies come back to common sense. Your body desperately wants to move, and you need to make time for that movement - and approach it with a plan as you would any other priority in your life.

Sign-up Today for our FREE Newsletter and receive a four-part video series on how to deadlift!

Name
Email
Read more

Random Thoughts on Sports Performance Training – Installment 20

It's hard to believe that we're 20 installments deep on this series, but I'm glad they've been so well received and definitely plan to continue to write them. Here goes!

1. Tall athletes are usually longer term projects.

When you have a 15-year-old 6-6, 150-pound kid with size 17 shoes, you have your work cut out for you.

These athletes are challenging for a number of reasons:

a. Their bone growth has usually outpaced their flexibility (except in kids - usually those who haven't finished puberty - who have preserved their childhood joint laxity). This often means that they have to do a fair amount of "preliminary" work just to get into good positions to benefit from big bang exercises.

b. Their center of mass has rapidly shifted up away from their base of support, creating a constantly unstable state.

c. A longer spine is a lot harder to stabilize than a shorter one.

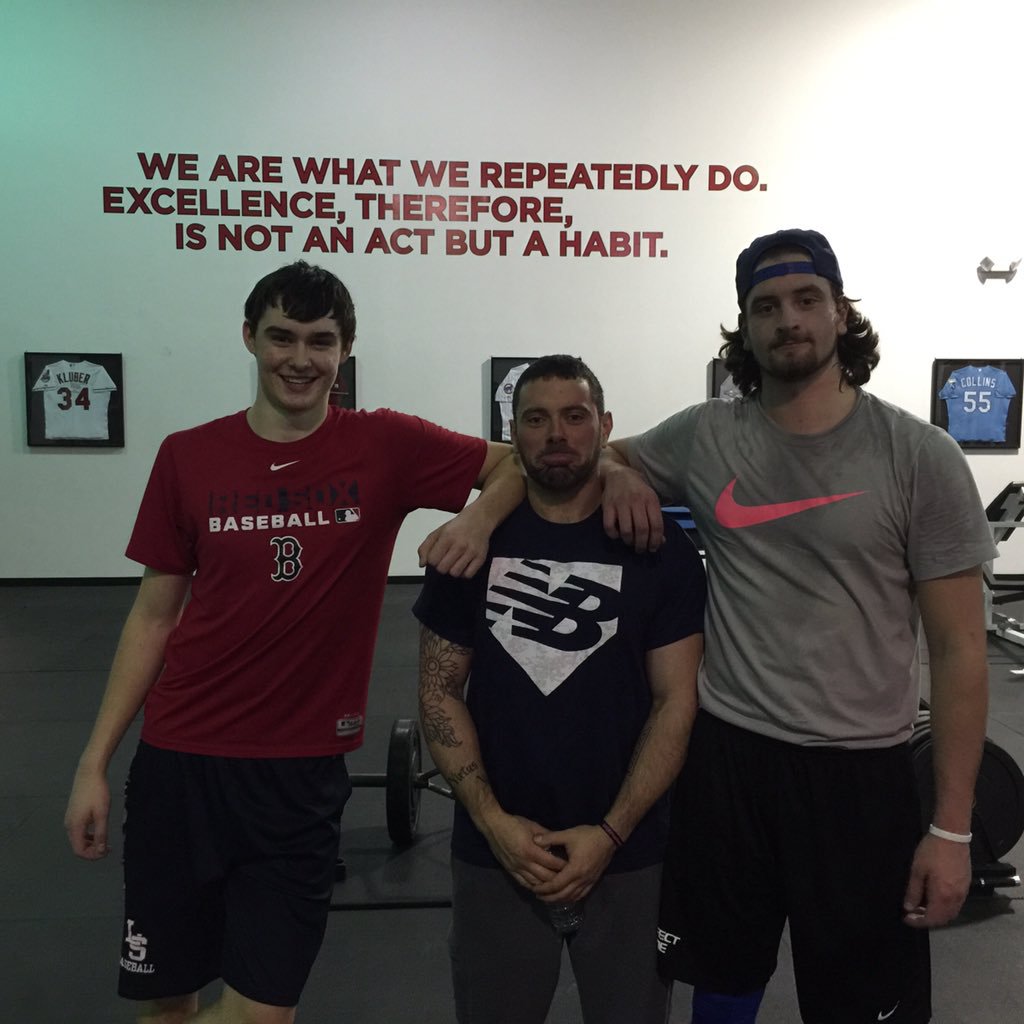
d. You can put 20 pounds on one of these athletes and barely notice. As a frame of reference, in the picture below, the 6-6 athlete on the left added 31 pounds between September and February (when this picture was taken) to get to approximately 200 pounds. Meanwhile, Greg Robins (the CSP coach in the middle) actually weighs more than him even though his about eight inches shorter.

CaUpYB-WQAAx7xK.jpg-large

e. Even if you put that 20 pounds on them, it might not be enough to have a "grounding" effect on the athlete. Unless an athlete is very gifted in terms of reactive ability (as you might see with lighter weight NBA players), you might need to add a lot more weight for them to learn how to properly load the lower extremity to create athletic movement using the stretch-shortening cycle. 

f. At younger ages, they're often put in positions that don't require as much movement (first base, DH, or pitcher in baseball; center in basketball; goalie in soccer; etc.). This may rob them of crucial exposure to movement "education."

 The take home points?

[bctt tweet="In tall athletes, push patience, consistency, calories, and perfect technique on fundamentals."]

 2. It's not your job to have all the answers.

Earlier this week, I sent along a nutrition question to Cressey Sports Performance's first employee, Brian St. Pierre. Brian is now Director of Performance Nutrition for Precision Nutrition and a tremendous resource we have at our fingertips on everything relating to nutrition and supplementation. Within 24 hours, Brian had sent along a 244-word reply that covered his anecdotal experiences on the topic in question, along with some recommended reading in case I was interested in what the peer-reviewed evidence demonstrated.

I'd love to have all the answers, but I simply don't. As such, I refer out all the time - whether it's a question like this on the nutrition front, or sending a client to a physical therapist. Your job is to deliver the best possible outcomes for your athletes/clients, and referring out regularly usually leads to those ends - and creates learning opportunities for you via the collaborative efforts that occur during the referral.

It's not your job to have all the answers; it's your job to know where you can find them.

3. It's important to understand how much relative strength an athlete needs - and that is sport and position specific.

I'll use my experience with baseball to make this point.

Pitching is a combination of absolute and relative strength and power. From an absolute standpoint, more body weight equates to more force to push off the mound, and more momentum moving downhill; that's why gaining weight can have such a profound impact on pitching velocity.

On the other hand, from a relative strength and power standpoint, you eventually have to "accept" all the force you create. We know that there are substantial ground reaction forces taken on by the front leg, and research has demonstrated that they are (not surprisingly) directly impacted by body weight. Additionally, according to 1998 research on professional pitchers from Werner et al., at ball release, the distraction forces on the shoulder are approximately 108% of body weight. You could also make the argument that these forces are even higher now, as average fastball velocity has crept up significantly since 1998, and the subjects in that study averaged only 89mph. As is the case with body weight increases, as arm speed rises, so do shoulder distraction forces. 

1024px-CC_Sabathia

In hitting, "accepting" force on the front side isn't as stressful because we don't hit downhill on a mound. However, batters have to run the bases, and that's a significant relative strength challenge.

With all this in mind, you it's important to realize that some athletes need to gain weight, some athletes need to lose weight, and some athletes are good right where they are. Obviously, body composition plays into this as well, but speaking in general terms, understanding strength-to-bodyweight ratios in sport-specific contexts is really important for all strength and conditioning coaches.

4. Use upper body drivers in your lower body mobility work.

This video from Mike Robertson got me thinking a lot:

We've done quite a bit of upper body reaching in our warm-ups with drills like the lateral lunge with overhead reach, but typical, this motion has really only occurred in the sagittal plane:

Conversely, if you look at the bowler squat, the upper body reach drives hip internal rotation, adduction, and flexion on the support leg.

Moving forward, I plan to get a lot more creative with using reaching to challenge folks in the transverse and frontal planes during our warm-ups. 

 Sign-up Today for our FREE Newsletter and receive a four-part video series on how to deadlift!

Name
Email
Read more

3 Principles for Understanding and Improving Mobility

Today's guest post comes from Dean Somerset, the creator of the excellent resource, Ruthless Mobility, which is on sale for 60% off through the end of the day on Monday, July 4. Dean is a tremendous innovator and one of the brighter minds in the fitness industry today, and this article is a perfect example of his abilities. Enjoy! - EC

ecover-167-DVDcase-267x300

Mobility can be described in a number of different ways, depending on who is writing the story: yoga, flexibility, stretching, movement training, dynamic warm-ups, bendy stuff, and in some cases “how the heck do you even do that?” Regardless of what it’s called or who’s doing it, there are some basic rules and physiologic elements to be aware of when it comes to understanding mobility and how to use it in training programs. Today I wanted to outline the "three big rocks" of developing, using, and maximizing mobility in a safe and progressive manner. 

1. Structure Determines Function.

It’s easy to say that genetics are a separating feature for those who can gain a lot of muscle and those who have trouble adding a pound. The same can be said of those who are congenitally lax (via something like a higher Beighton hypermobility score or a diagnosis of Ehlers Danlos syndrome), compared to people who move like the tin man. Some of this could be connective tissue related difference in collagen to elastin ratio, but much of it could also be considered by the shape and orientation of the joints themselves.

In terms of the acetabular angle, D’Lima et al (2011) found in a computerized prediction model for prosthesis implantation that:

a. those with more acetabular anteversion (forward placement on the pelvis) had greater flexion range of motion and less extension
b. lateral placement of 45-55 degrees gave the best overall mobility
c. a lateral angle of less than 45 degrees gave more flexion range of motion and more than 45 degrees gave less rotation capability
d. if the femoral neck was thicken by 2 mm in diameter, it significantly reduced the range of motion in all directions, irrespective of placement.

Higgins et al (2014) even showed there was a large difference in anteversion angles bilaterally in the same individual (potentially lending some validity to PRI concepts of inherent asymmetry), with as much as a 25 degree difference in anteversion angle between left and right hip. This could translate to a difference in flexion range of motion of 25 degrees between your two hips, without any other feature affecting the outcomes. Zalawadia et al (2010) showed there’s a big variance in the femoral anteversion angle (whether the head of the femur pointed more forward or possibly backward) as the femoral neck attaches to the acetabulum, with the majority being between 10-20 degrees.

Additionally, some acetabulums have too large of a center edge angle, where the socket faces more inferiorly than laterally, which makes impingement during abduction more likely compared to a smaller center edge angle.

Screen Shot 2016-06-29 at 9.32.28 PM

These structural differences are primarily set and unchanging after puberty when bones don’t deform as easily to external forces as with young kids. Baseball pitchers can undergo deformational changes at the proximal humerus (upper arm) to allow a much greater external rotation range on their throwing arm compared to adults who pick up the sport later in life. Eric showed that with his comparison of presidential first pitches HERE.

With advancing age, joint range of motions tend to reduce further with degenerative changes to the structures involved, either with an increase in concentration of cortical bone at contact areas, a reduction of cartilage thickness, or decreased fluid content of the joint space itself. The end result is a tighter joint that doesn’t move as easily.

Most of these types of changes, barring injury or disease, tend to not be limiting factors in mobility until many decades have passed, so if you’re in your 20s and concerned about your lack of mobility, it’s pretty safe to say that it’s likely not related to degenerative changes just yet. If you’re 50 or 60, it’s much more of a likely scenario.

This Canadian study showed that men lost an average of 5 degrees of shoulder abduction and 6 degrees of hip flexion per decade between 55 and 86 years old, while women lost an average of 6 degrees of shoulder abduction and 7 degrees of hip flexion in the same age range, and that this loss sped up after 70 years old and was actually not linked to self-reported activity levels. Being more active is better for everything as you age, but based on this study, not necessarily for keeping your mobility into your golden years.

What this means is that everyone will be different in terms of how much mobility they have and in which directions or movements. One person may be able to press overhead because they have joints that easily allow it, while another may never get there due to specific limitations, and a third may just not be ready to press yet. They may have the specific ability to do the motion, but don’t have the control or strength at the moment to do it effectively, which is where part 2 comes in.

So how do you determine a structural limitation? The best mechanisms are simply to see what the range of motion looks like in a couple of scenarios:

a. passive – have someone move you through the range while you’re relaxed)

b. supported - pull the joint through a range without using the muscles involved in the action. (Think a hamstring stretch with a towel wrapped around the foot and pulling on it with your arms)

c. in a different position or direction – in looking at hip flexion, compare a squat to a rock-back or Thomas test to look at the same range of motion.

If you consistently get the same joint angles in different motions or positions, it’s reasonable to believe that could be the true limit of your flexibility based on structural aptitudes. There’s always a potential that the limitation could be something else, and if you involve some of the training practices and options used later and notice an improvement, it’s a happy bonus. Short of developing X-ray vision, these are some of the best options for determining structure that everyone has available to them, whether we’re talking about the clinician, trainer or average meathead looking to get all bendy and stuff.

2. Can you actually get there?

Now, let's consider shoulder mobility; imagine that we look at an individual in supine and there’s no limitation standing in the way of going through full shoulder flexion.

SupineShoulderFlexionAssessment1

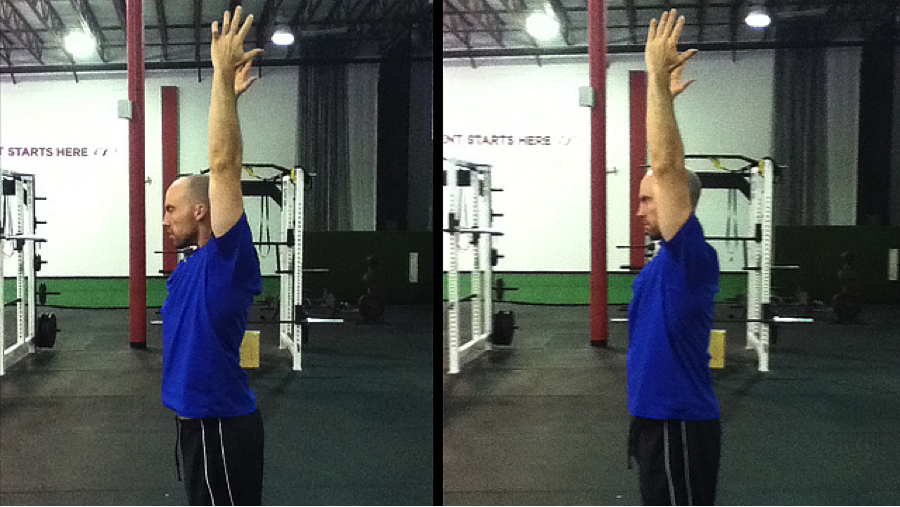
However, when this same individual is asked to bring their arms overhead in an upright position, they do some wonky shoulder shrug, low back arch, and their upper lip curls for some reason. In short, they aren’t able to access that flexion movement very well, even though they have the theoretical aptitude to get there on their own.

We’re looking for the image on the right, but wind up getting the image on the left:

shoulderflexion

Now the great thing about the body is it will usually find a way to get the job done, even if it means making illegal substitutions for range of motion from different joints. In this case, the lack of shoulder motion is made up with motion from the scapula into elevation instead of rotation, and lumbar extension in place of the glenohumeral motion.

This by itself isn’t a problem, but rather a solution. It’s not bad to have something like this happen by itself, but it does alter the specific benefits of an exercise when the segments you’re looking to have do the work aren’t actually contributing, and you’re getting the work from somewhere else. There’s also the risk of injury from poor mechanical loading and improper positioning that increases the relative strain on some areas that aren’t meant to be prime movers for the specific exercises.

Now, the big question is whether someone is willing to not do an exercise because they’re demonstrating that they’re not ready for at the moment. If a client wants to squat in a powerlifting competition, but his hip range of motion makes it very difficult to get below parallel to earn white lights without losing lumbar positioning or grinding the hip joints to pieces, how willing would he be to adjust his training or eliminate that possibility to save a lot of hassles? Some people identify themselves by their sport, so telling them not to do what they love isn’t an option. I’ve worked with a lot of runners, and saying “don’t run” tends to go in one ear and out the other.

Back to the overhead example, maybe going right overhead isn’t possible at the moment, but a high incline press can be done easily. This is working in what Mike Reinold calls on Functional Stability Training: Optimizing Movement “Green Zone vs Red Zone training.” Overhead at the moment is a red zone movement as they can’t get there easily and on their own. Green zone would be a landmine press, where they’re still working on flexion, but not moving into a range they can’t easily access.

One manner that could help an individual access this range of motion if they have shown an ability to get there passively is through what Dr. Andreo Spina calls eccentric neural grooving of the motion. Use either a support or pulley to get into the terminal range of motion, release the support or pulley and try to maintain the terminal position while slowly moving out of the end range as controlled as possible. Here’s Dr. Spina doing ENG work on the ankle and anterior shin for some dorsiflexion work.

Here’s another version with yours truly working on a similar variation via controlled hip abduction:

You could do this for the shoulder easily enough as well by grabbing a rope, pulling the shoulder into flexion, releasing the rope, and trying to maintain the position before slowly lowering the arm out of terminal flexion. Just make sure you’re not letting your low back arch or shrug up your shoulder blades in to your neck.

3. Can you use it with force when needed?

So now you’ve shown you have the joints to do stuff, you can get there on your own without assistance, and you want to train the heck out of it to look like your favorite Instagram bendy people.

One thing to consider when exploring these ranges of motion is that force production tends to be greatest in mid-range positions, likely due to the greatest torque development required to overcome natural leverage elements and also due to spending less time in the end ranges. There’s also the reduction of cross bridge linkages in these positions, limiting sarcomeric action when you’re gunning your biceps in peak flex.

Controlling these end ranges (even if the goal may not be to develop maximal force in them for moving the biggest weight from point A to B) can help expand the usable range of motion where peak torque development occurs, as well as provide the potential for expanding sub-maximal torque percentage ranges of motion. These movements aren’t easy and tend to take a lot of mental energy coupled with physical effort, but if getting awesome was easy, everyone would already be there.

Summary

To round things out, understanding and developing mobility comes down to:

a) having the structure to produce the range of motion
b) being able to get into position to effectively use that range of motion
c) building strength and conditioning within that range of motion to keep the ability to use those ranges for a long time, and through as many positions and directions of movement as possible.

Some specific movements or positions may not be possible due to your own unique structure and abilities, but work hard at using everything you do have, build strength throughout the entire range of motion, and enjoy the process as much as the outcomes.

Note from EC: If you're looking for more mobility tips and tricks - and the rationale for their inclusion in a program - I'd encourage you to check out Dean's fantastic resource, Ruthless Mobility. Your purchase includes lifetime updates and continuing education credits. Perhaps best of all, it's on sale for 60% off through this Monday (7/4) at midnight.

full-package


Read more

10 Ways to Remain Athletic as You Age

Back in my early-to-mid-20s, my focus shifted into powerlifting and away from a "traditional" athletic career. While I got a ton stronger, I can't say that I felt any more athletic. In hindsight, I realize that it was because I trained strength at the exclusion of many other important athletic qualities. Since then, I've gone out of my way to include things that I know keep me athletic, and as a result, into the latter half of my 30s, I feel really good about taking on anything life throws my way. With that in mind, I thought I'd pull together some recommendations for those looking to remain athletic as they age.

1. Stay on top of your soft tissue work and mobility drills.

Without a doubt, the most common reason folks feel unathletic is that they aren't able to get into the positions/postures they want. As I've written in the past, it's much easier to do a little work to preserve mobility than it is to lose it and have to work to get it back. Some foam rolling and five minutes of mobility work per day goes a long way in keeping you athletic.

2. Do a small amount of pre-training plyos.

I think it's important to preserve the ability to effectively use the stretch-shortening cycle (SSC). That's not to say that every gym goer needs to be doing crazy depth jumps and sprinting full-tilt, though. A better bet for many folks who worry about tweaking an Achilles, patellar tendon, or hamstrings is to implement some low-level plyometric work: side shuffles, skipping, carioca, and backpedaling. Here's a slightly more advanced progression we use in The High Performance Handbook program:

The best bet is to include these drills right after the warm-up and before starting up with lifting.

3. Emphasize full-body exercises that teach transfer of force from the lower body to the upper body.

I love cable lift variations to accomplish this task in core exercises, but push presses, landmine presses, and rotational rows are also great options.

4. Emphasize ground-to-standing transitions.

Turkish Get-ups are the most well-known example of this challenge, but don't forget this gem:

5. Get strong in single-leg.

Squats and deadlifts will get you strong, no doubt, but don't forget that a big chunk of athletics at all levels takes place in single-leg stance. Lunges, 1-leg RDLs, step-ups, and split squats all deserve a place in just about everyone's training programs.

6. Use core exercises that force you to resist both extension and rotation.

Efficient movement is all about moving in the right places. The lower back isn't really the place to move, though; you should prioritize movement at the hips and upper back. With that in mind, your core work should be focused on resisting both extension (too much lower back arching) and rotation. Here are a few favorites:

7. Train outside the sagittal plane.

It's important to master the sagittal (straight ahead) plane first with your training programs, but once you get proficient there, it's useful to progress to a bit of strength work in the frontal place. I love lateral lunge variations for this reason.

8. Chuck medicine balls!

I'm a huge fan of medicine ball drills with our athletes, but a lot of people might not know that I absolutely love them for our "general population" clients as well. I speak to why in this article: Medicine Ball Workouts: Not Just for Athletes. Twice a week, try adding in four sets at the end of your warm-up and prior to lifting. Do two sets of overhead stomps and two sets of a rotational drill, starting with these two variations in month 1:

In month 2, try these two:

Trust me; you'll be hooked by the "8-week Magic Mark."

9. Be fast on your concentric.

If you want to stay fast, you need to keep a fast element in your strength training program. This can obviously entail including things like Olympic lifts, jump squats, and kettlebell swings. Taking it a step further, though, you can always just make a dedicated effort to always accelerate the bar with good speed on the concentric (lifting) portion of the movement. 

10. Play.

In a given week, on top of my normal lifting, I might catch bullpens, sprint or condition with my athletes, play beach volleyball, or run a few football receiving routes at the facility. The old adage, "Variety is the spice of life" applies to fitness and athleticism, too. Don't be afraid to have some fun.

The longer you've been training, the more you realize that your strength and conditioning programs have to be versatile enough to preserve your athleticism and functional capacity while still keeping training fun. If you're looking for a flexible program that's proven effective across several populations, I'd encourage you to check out my flagship resource, The High Performance Handbook, especially since it's on sale for $50 off through Sunday at midnight. The discount is automatically applied at checkout at www.HighPerformanceHandbook.com.

HPH-main

 Sign-up Today for our FREE Newsletter and receive a four-part video series on how to deadlift!

Name
Email
Read more

5 Strength and Conditioning Exercises that Overdeliver

One of the most popular features of The High Performance Handbook is the extensive online video database it includes. With that in mind, I thought I'd highlight a few of my favorite exercises that are included in the program. I like these, in particular, because they're "anti-isolation" exercises. In other words, they deliver multiple training effects to give gym-goers more efficient training outcomes. Keep in mind that just because I don't include classic compound lifts like squats and deadlifts in this discussion doesn't mean that they aren't absolutely fantastic; I just want to give you a little exposure to some different drills in this post.

1. Kettlebell Crosswalk

Because of the asymmetrical loading, you get some great rotary stability work at the core - on top of the anterior core stability work you get from holding a weight overhead while resisting too much arching of your lower back. You get some outstanding shoulder mobility and stability benefits, as getting the top arm up requires a lot of scapular upward rotation and rotator cuff activation. Finally, an overlooked benefit is the opportunity to reaffirm good neck positioning. A lot of athletes will want to shoot into forward head posture, but if you pack the neck correctly, you'll be able to avoid this.

2. Positional Breathing

I use a wide variety of positional breathing drills as part of The High Performance Handbook program, so this is really more of a "category" than a specific exercise. When you put athletes (especially those with more "extended postures) into a more flexion biased position and encourage them to full exhale, you are effectively training both mobility and stability simultaneously. When you exhale, many of the muscles of inhalation - scalenes, sternocleidomastoid, lats, pec minor (not surprisingly all muscles that have chronic tissue density in many individuals) - all are forced to relax. Concurrently, the rectus abdominus and external obliques fire to get air out - and in the process, establish better anterior core stability.

Here are a few examples:

3. Dumbbell Reverse Lunge to 1-leg RDL

Whenever I put this in an athlete's program, I go out of my way to warn them that they'll be pretty sore in the days that follow. Lunging and 1-leg RDLs constitute different kinds of single-leg work with different training effects, but when you combine them, you can get the best of both worlds.

This can also be done with one dumbbell at a time. As athletes get more proficient with the drill, I look for more "fluid" transitions, as opposed to a lot of stop-and-go movements.

4. 1-arm KB Turkish Get-up

This one is just too obvious. To do a good get-up, you need everything from a hip hinge, to anterior core control, to shoulder mobility, to single-leg stability.  


View this post on Instagram


I love the Turkish get-up for a lot of reasons, ranging from reflexive rotator cuff recruitment, to scapular upward rotation, to hip mobility. However, this position of the get-up is the single-biggest reason that I like it the most in our rotational athletes. 👍 The ability to differentiate between hip flexion (i.e., hip loading) and lumbar extension/lateral flexion/rotation is of paramount importance to controlling the trunk during both pitching and hitting. And, the fact that it occurs with a considerable amount of hip range-of-motion demands (into abduction and rotation) is huge. 👇 Load the hips on the way up, and again on the way down. Don't just flop over into a side bend. Thanks for the demo, @michaelsailors! #cspfamily

A post shared by Eric Cressey (@ericcressey) on

If you're looking for a great coaching resource on Turkish Get-up Technique, check out 6 Common Turkish Get-up Technique Mistakes.

5. Combination Mobility Exercises

Let's face it: nobody really enjoys mobility warm-ups. Fortunately, for those of you who dread these drills and prefer to get to the lifting as quickly as possible, there are some combination drills that speed up the process a bit. Check out these two examples from the program:

Wrap-up

If you're looking to learn more about how all these different pieces fit with an overall strength and conditioning program "puzzle," then I'd encourage you to check out my most popular resource, The High Performance Handbook. It offers programs versatile enough to accommodate a wide variety of training goals. Learn more at www.HighPerformanceHandbook.com.

HPH-main

Sign-up Today for our FREE Newsletter and receive a four-part video series on how to deadlift!

Name
Email
Read more

4 Rules of Posture

Today's guest post comes from Physical Therapist Chris Leib. Enjoy! -EC

chrisl

Recently, there has been plenty of discussion regarding the efficacy of the idea of posture and whether attempting to improve it is a useful tactic for decreasing pain. This discussion has been perpetuated by research indicating that there is a surprisingly poor correlation between pain and posture. The evidence seems to be pretty damning on this topic, which raises questions about whether looking at pain as an outcome measure actually makes sense when discussing posture. Moreover, even more basic questions still need to be asked regarding the very definition of posture.

When discussing these inquiries, it’s important to understand that the current research has demonstrated that pain is far more complex than previously thought, and that a single model of physiological stress will not be sufficient to demonstrate why some people experience pain and some do not. A discussion of pain science is too complicated to be brushed over in the present discussion; however, it must be understood:

[bctt tweet="Just because proper posture hasn’t been highly correlated with pain doesn’t mean it’s not important."]

When looking deeper into the studies cited above, it becomes clear that there is not a consensus definition of posture. Instead of looking at the constantly changing nature of posture, many of these studies defined posture by using various markers of static structure. Taking this fact into consideration, one must ask the following question: If no agreement is reached as to what proper posture is, how can it be well studied?

In my experience over the past decade as both a strength and conditioning professional and physical therapist, my own definition of proper posture has evolved considerably. Utilizing these years of clinical experience and the current research, I would like to set forth the following 4 Rules of Posture.

Rule #1: Posture May Not Cause Pain, But Improving Posture Can Help to Decrease Pain.

Although there is poor evidence that various definitions of poor posture are associated with increased pain, it’s obvious through clinical assessment that a change in posture can decrease pain when it is present. Go to any physical therapy clinic and you will find patients in pain getting education regarding postural changes that improve their symptoms on the spot. Pain can be a great indicator of what the body feels is a stable position. Often, immediate positive changes are made just by getting the person into a different position.

A common example is the individual with neck pain who has pain when sitting slouched with his or her head forward. Frequently, a combination of education and ergonomic adjustment can abolish this excruciating pain in shorter order. Now, this isn’t to say that the quick fix always “cures” the problem, but it does gives the person more feelings of control over making change with regard to their pain, which actually goes a long way. This sense of control has been demonstrated to be a positive indicator of recovery from and the ability to cope with chronic pain .

Rule #1 is the only rule in which we’ll discuss pain. As I noted, the research on pain indicates that the science is far too complex to discuss isolated associations. Clinically, pain can be a good feedback indicator of postures and positions that a person’s body finds unsafe. This feedback helps determine the best positions for the person to train in and, with time, adopt.

The subsequent three rules will discuss posture in relation to functional and physical performance-based movement quality.

Rule #2: Support Yourself Actively and Passively.

This rule will illustrate the difference between passive and active postural stability, as well as the appropriate balance that’s needed between the two. Let’s get some definitions out of the way first.

Generally speaking, passive stability is using something other than balanced muscular effort to adopt and maintain a desired position. Passive stability can either be anatomical or external in nature. Anatomical passive stability utilizes one’s passive stability structures such as joint capsules, cartilage, and ligaments to find stability in a position, while external passive stability utilizes an external item for extra support when attempting to maintain a position. When dealing with passive stability of any type, the common denominator is finding a stable position while decreasing relative muscular effort.

Active postural stability, on the other hand, refers to the use of muscles to maintain a desired position. In order to optimize muscle activity during static and dynamic postures, the attachments of the muscles must be positioned so that the muscles contract in a balanced way. In addition, the position should minimize energy expenditure against the pull of gravity.

For clarification on how best to determine optimal positioning based on the above definitions, let’s illustrate a common static and dynamic example.

i. Static postural stability: Sitting in a chair

No matter what, this common static position will never be ideal for postural stability due to the severe muscle imbalances inherent to sitting with your hips and knees in 90 degrees of flexion. However, sitting with the head and shoulders substantially in front of the line of gravity makes a bad situation even worse. The further forward the head and shoulders travel out in front of this line, the more effort the muscles that hold up the head and trunk must exert. More importantly, because the muscles in this case are overstretched and in a poor position to function in a balanced way, less resilient structures such as ligaments and joint capsules/cartilages are forced to pick up the slack.

Thus, the most optimal default position in sitting is the one that minimizes the effort of your muscles and stress to your other more passive structures by allowing the head and shoulders to balance effortlessly in the line of gravity. (Feel free to take this opportunity to observe your own posture. Are your head and shoulders neatly stacked or forward like the pass from the 2000 Music City Miracle?)

NeckPosture

ii. Dynamic postural stability: Deadlifting a heavy load from the ground

In this dynamic example, the muscles of the hips, lower back, abdomen, and thorax will be in the most balanced position to lift the load when the pelvis is in a neutral position. That is to say, the lower back should neither be flexed nor extended. In this position, the muscles of the lower back are well balanced with that of the abdomen, and the hip extensors have a better opportunity to contract during the lift.

If the lift were initiated with the lower spine in an extended position, the position can still indeed be stable; however, the stability would come from passive anatomical structures such as the lumbar facet joints and ligaments of the anterior spine. This position increases compressive forces to the lower back and decreases the contractile ability of both the abdominals and hip extensors, as both of these muscle groups are now in an over-lengthened position.

DL posture

Therefore, the optimal position for the dynamic movement of deadlifting is the one that allows for the hip/trunk flexors and hip/trunk extensors to work in the most balanced fashion (see video below). Moreover, setting up the movement and transitioning the bar in such a way that the load stays as close to the body as possible minimizes the downward pulling effects from gravity much like the head and shoulders staying over the midline of the body in the previous sitting example.

When attempting to understand how best to balance active and passive stability within a specific task, we must take into consideration four factors: (1) the available tissue mobility in order to get into the position required; (2) the external objects manipulated or used for positioning; (3) the duration of the task; (4) the intensity of the task.

Let’s return once again to our two examples:

i. Static postural stability: Sitting in a chair

For static sitting, we must first assess ranges of motion like thoracic extension, shoulder internal/external rotation, and scapular retraction/depression/posterior tilt. In doing so, we’re able to determine whether the desired position can be assumed without pain or excessive compensatory muscle effort. Moreover, we must know the type of seat the client will be utilizing and what activities he or she will be doing while sitting (i.e. typing, driving, etc.).

In terms of duration and intensity, sitting will typically fall under the category of a low intensity activity done for long durations. The longer the duration, the more muscular endurance necessary to maintain a desired position. If any of the above factors are not optimal, external passive support in the form of a lumbar cushion, posture shirt, or corrective tape may be necessary to enable the client to attain a more favorable posture without excessive effort.

seated

(Passively elevating the hips to decrease the effort to maintain an upright torso)

ii. Dynamic postural stability: Deadlifting a heavy load from the ground

With deadlifting, mobility limitations in the hips and trunk can often limit an individual’s ability to adopt and maintain the optimal stable position described above. In addition, the intensity of the load or duration of the set must not exceed the amount of muscular force the individual is able to generate, or else even a solid initial position will be lost.

In cases where mobility restrictions are a limiting factor, passive support can come in the form of apparatuses that decrease the range of motion of the movement (i.e. elevating the load onto blocks or a rack). When approaching maximal loads or durations, passive support may take the form of stability belts and braces in areas most susceptible to positional failure.

2DLs

3. Posture is the Product of Your Movement Variability.

Posture is often discussed as a single static element that represents one’s lack of mindfulness or genetic misfortune. Clinical experience and the current scientific literature say this belief is not only wrong, but also a harmful notion to the process of making postural change. One shouldn’t feel guilty or unfortunate that he or she is demonstrating an unskillful posture. Instead, there should be an understanding that posture is not a single static entity, but rather task dependent and constantly changing.

The secret to good posture is that you shouldn’t need to work for it when you are at rest. You see, your static postures during sitting, standing, and walking are a product of your cumulative movement throughout the day. Our bodies are built to adapt to the positions and activities we take on most frequently. If any of these positions and activities are done is excess, all our positions and movement can become imbalanced. This imbalance is what is deemed by many as poor posture, but in reality it is just the body doing what it does best: adapting.

In order to prevent postural imbalances, it is unwise to attempt to simply make ergonomic adjustments to the positions we sustain too frequently. Instead, we must consider our whole body of movement throughout the day. If we focus on proper positioning in training, it will inevitably transfer to our static postures. In this way, programming for any strength, conditioning, or fitness routine must involve a strong focus on developing positions that promote muscular balance (active postural stability) and task transference, as opposed to simply task completion.

For example, there are many ways to push yourself up from the ground when doing a push-up, but there are positioning subtleties that can either promote balanced muscular stability or feed habits of chronic positioning that we already practice too frequently throughout the day (see video below). Thus, an individual’s movement practice should be about movement quality and variability as much as about cultivating strength and conditioning.

Mindless prescription of physical activity (i.e. 30-60 minutes of aerobic exercises; 3 sets of 10 of machine based resistance exercise) prioritizes strength and conditioning capacity over movement capability and variability, hoping that by blindly improving one’s quantity of routine movements the quality of movement will also improve. Don’t get me wrong, in moderation, more movement is better than less movement. However, too much of the same movements can create similar problems as too little movement.

4. Counterbalance Your Life.

The idea of increasing movement quality and variability goes way beyond one’s time at the gym. To allow for increased ease of active postural stability, the common patterns of one’s entire day need to be understood so that behavioral change can be implemented. This is not to say that if we sit all day at work then we need to get a new job. That’s just not practical. Nor does it mean that we must be obsessed with maintaining an upright posture or “drawing our abdomens in” all day long. It simply calls for awareness — awareness of the positions that are most frequently adopted and strategies for counterbalancing them.

Guidelines for this awareness are three-fold:

i. Understand the chronic positions you adopt.

Often postural counterbalances are subtle and developing improved body awareness becomes much more important than simply adjusting your position. This improved body education can come in many forms, such as independent reading on anatomy and physiology, advice from a movement professional, or cultivation of a versatile movement practice as discussed above. It’s important to know that ultimately YOU have the best opportunity to understand your own body. It can be a gradual process to refine this body awareness, but once developed, understanding the positions and movements that are healthy versus harmful to your specific body becomes much easier.

ii. Separate times you must be stationary and times you choose to be stationary.

It’s important to have a plan of attack for positioning throughout your day. Practically speaking, if you sit all day at work, acknowledge it, and then minimize the time you sit when in the comfort of your home. Likewise, if you are on your feet all day, don’t be afraid to spend some time vegging out on the couch. One stationary position is not necessarily better than the other (i.e. standing is not better than sitting). It’s the one that you do most frequently that will usually lead to problems.

iii. Expand your positional repertoire.

When attempting to adopt positions different from those in which you are most comfortable, it is important to have other positions at your disposal. For example, sitting in a chair is a completely different mechanical stress than sitting cross-legged on the ground, just as standing stationary on two legs is different than weight shifting effortlessly from one leg to the other. Similar to the idea of developing more movement variability in an exercise practice, it’s important that you’re able to adopt positions besides those you do most frequently. This may be another area where the help of a movement professional is necessary so that you can become comfortable with the mobility and stability necessary to adopt different variations of sitting and standing positions.

See the video playlist below regarding positional variations for sitting (chair and ground) and standing:

In conclusion, there is plenty of disagreement and misunderstanding around the topic of posture. In my experience, this controversy is unnecessary and overblown. Any respectable strength and conditioning professional would agree that proper positioning and technique is vital when undertaking various movements in a strength and conditioning program. Why should the importance of positioning be any different in our movements throughout the day? We must understand that our bodies are constantly changing; therefore, posture should be viewed as a dynamic, ever-changing journey — not a fixed destination. Hopefully the 4 Rules of Posture set forth above allow you to better understand how to embrace this journey!

About the Author

Chris Leib of MovementProfessional.com is a licensed Doctor of Physical Therapy and Certified Strength and Conditioning Specialist with nearly a decade of experience in treating movement dysfunctions and enhancing human performance. He has written for many popular training and rehabilitation websites, and has a versatile movement background with a variety of certifications as both a physical therapist and fitness professional. Chris considers physical activity a vital process to being a complete human being and is passionate about helping others maximize their movement potential. Be sure to follow him on Facebook and YouTube.

A special thanks to Travis Pollen of www.FitnessPollenator.com for his help with this article.

References

1. Grundy, Roberts (1984) Does unequal leg length cause back pain? A case-control study. Lancet. 1984 Aug 4;2(8397):256-8. http://www.ncbi.nlm.nih.gov/pubmed/6146810

2. Pope, M., Bevins, T., Wilder, D., & Frymoyer, J. (1985). The Relationship Between Anthropometric, Postural, Muscular, and Mobility Characteristics of Males Ages 18-55. Spine, 644-648. http://www.ncbi.nlm.nih.gov/pubmed/4071274

3. Grob, D., Frauenfelder, H., & Mannion, A. (2006). The association between cervical spine curvature and neck pain. European Spine Journal Eur Spine J, 669-678. http://www.ncbi.nlm.nih.gov/pmc/articles/PMC2213543/

4. Nourbakhsh, M., & Arab, A. (2002). Relationship Between Mechanical Factors and Incidence of Low Back Pain. J Orthop Sports Phys Ther Journal of Orthopaedic & Sports Physical Therapy, 447-460. http://www.ncbi.nlm.nih.gov/pubmed/12322811

5. Dieck, G., Kelsey, J., Goel, V., Panjabi, M., Walter, S., & Laprade, M. (1985). An Epidemiologic Study of the Relationship Between Postural Asymmetry in the Teen Years and Subsequent Back and Neck Pain. Spine, 872-877. http://www.ncbi.nlm.nih.gov/pubmed/2938272

6. Franklin, M., & Conner-Kerr, T. (1988). An Analysis of Posture and Back Pain in the First and Third Trimesters of Pregnancy. J Orthop Sports Phys Ther Journal of Orthopaedic & Sports Physical Therapy, 133-138. http://www.ncbi.nlm.nih.gov/pubmed/9742469

7. Lederman, E. (2010). The fall of the postural-structural-biomechanical model in manual and physical therapies: Exemplified by lower back pain. Journal of Bodywork and Movement Therapies, 131-138. http://www.cpdo.net/Lederman_The_fall_of_the_postural-structural-biomechanical_model.pdf

8. Christensen, S., & Hartvigsen, J. (2008). Spinal Curves and Health: A Systematic Critical Review of the Epidemiological Literature Dealing With Associations Between Sagittal Spinal Curves and Health. Journal of Manipulative and Physiological Therapeutics, 690-714. http://www.ncbi.nlm.nih.gov/pubmed/19028253

9. Evidence-Base for Explain Pain, Second Edition. (n.d). Retrieved October 2, 2015. http://www.noigroup.com/documents/noi_explain_pain_2nd_edn_evidence_base_0813.pdf

10. Control, culture and chronic pain. (n.d.). Retrieved October 2, 2015.
http://www.sciencedirect.com/science/article/pii/0277953694900205

11. Garber, C., Blissmer, B., Deschenes, M., Franklin, B., Lamonte, M., Lee, I., Swain, D. (2011). Quantity and Quality of Exercise for Developing and Maintaining Cardiorespiratory, Musculoskeletal, and Neuromotor Fitness in Apparently Healthy Adults. Medicine & Science in Sports & Exercise, 1334-1359. http://journals.lww.com/acsm-msse/Fulltext/2011/07000/Quantity_and_Quality_of_Exercise_for_Developing.26.aspx

Read more

Do Your Strength and Conditioning Progressions Create Context?

It goes without saying that some athletes pick up new movements faster than others. Usually, this occurs because they have context from which to draw. 

As an example, an athlete might have a great hip hinge because they've done it previously while playing defense in basketball. Having that hip hinge proficiency helps the individual to efficiently learn a deadlift pattern (among many other athletic movements).

Establishing context is just one of many reasons that children should be exposed to a wide variety of free play and athletic endeavors. The more movement variability we have at younger ages, the broader the foundation we build. The wider the base, the more we can stack specific skills on top of it once the time is right.

It's foolish to think, however, that every individual we encounter in personal training, strength and conditioning, or rehabilitation settings will have this broad foundation of context from which to draw. This is where appropriate training progressions become so important. You select exercises with which individuals can be successful not only to build confidence and achieve a training effect, but also to establish context for further progressions.

As an example, if you want to be able to do a quality lateral lunge with overhead reach as part of your warm-up, you've got to be able to string together several movement proficiencies: full shoulder flexion range-of-motion; sufficient thoracic extension and scapular posterior tilt/upward rotation; hip adductor range of motion; hip hinge proficiency; and good stiffness in your anterior core and deep neck flexors to prevent low back arching and forward head posture, respectively.

When I'm teaching this pattern for the first time, I'll always say, "It's just like your back-to-wall shoulder flexion, but with a long lunge to the side."

Back-to-wall shoulder flexion is big-time "context creator" for me because I can teach it to just about anyone really quickly. In fact, I've taught it to seminars with 100+ people without many challenges. More importantly, it creates quality movement from the core all the way up (five of the seven movement prerequisites I noted earlier) - and that has big payoffs later on when one wants to teach anything from a push-up, to a landmine press, to a snatch, to an overhead medicine ball variation.

A lot of folks will read this article and think, "But these is just common sense progressions." I'd agree. However, as we've learned in recent years, in the world of larger group training without individualized programming, common sense isn't so common anymore - and as a result, folks wind up skipping steps and advancing to exercise for which they aren't ready. 

Perhaps more importantly, though, being able to effectively sequence coaching progressions will, in my opinion, become even more important in the years ahead. With the trend of early sports specialization, we're getting "less athletic athletes;" they don't have as much context in place, and wind up having to back-track. Additionally, we have an increasingly sedentary society, which certainly robs individuals of context.

All that said, just remember that if you want to have an exercise in your program, you have to think about how you're going to coach it with all the individuals that may come your way. And, that coaching might involve devising some exercise regressions that build context from which to draw.

Sign-up Today for our FREE Newsletter and receive a four-part video series on how to deadlift!

Name
Email
Read more

Building Aerobic Capacity with Mobility Circuits (Another Nail in the Coffin of Distance Running for Pitchers)

If you've read EricCressey.com for any length of time, you're surely aware that I'm not a fan of distance running for pitchers. I've published multiple articles (here, here, here, and here) outlining my rationale for the why, but these articles have largely been based on theory, anecdotal experience, and the research of others. Today, I wanted to share with you a bit of data we collected at Cressey Sports Performance - Florida not too long ago.

CSP-florida-021

First, though, I should make a few important notes that "frame" our training recommendations and

1. Athletes absolutely must have a well-developed aerobic system in order to recover both acutely (during the training session or competition/games) and chronically (between training sessions and competitions/games). It's relatively easy to improve if approached correctly, and can yield outstanding benefits on a number of physiological fronts.

2. As long as the intensity is kept low enough during aerobic training initiatives, it won't compromise strength and power development. I wrote about this all the way back in 2003 with Cardio Confusion, but many industry notables like Alex Viada, Joel Jamieson, Mike Robertson, Bill Hartman Eric Oetter, Pat Davidson, and Charlie Weingroff have done a far better job describing the mechanisms of action in the 12 years since that article was published. Speaking generally, most folks put the "safe zone" intensity for aerobic development without strength/power compromise at approximately 60-70% of max heart rate (Zone 2, for the endurance savvy folks out there).

3. It might be a large amplitude movement (great ranges-of-motion achieved), but baseball is a low movement variability sport. Pitchers are the most heavily affected; they do the exact same thing for anywhere from 6-9 months out of the year (or up to 12, if they're making bad decisions by playing 12 months out of the year). Distance running to me does not offer significant enough movement variability to be a useful training option for developing the aerobic system.

4. The absolute best time to develop the aerobic system is early in the off-season. For the professional baseball player, this is Sep-Oct for minor leaguers, and Oct-Nov for major leaguers. This is one more strike against distance running; after a long season of being on their feet in cleats, the last thing players need is a higher-impact aerobic approach.

With these four points in mind, two years ago, I started integrating aerobic work in the form of mobility circuits with our pro guys in the early off-season. The goals were very simple: improve movement quality and build a better aerobic foundation to optimize recovery – but do so without interfering with strength gains, body weight/composition improvements, and the early off-season recharge mode.

The results were awesome to the naked eye – but it wasn’t until this week that I really decided that we ought to quantify it. Lucky for me, one CSP athlete – Chicago White Sox pitching prospect Jake Johansen – was up for the challenge and rocked a heart rate monitor for his entire mobility circuit. A big thanks goes out to Jake for helping me with this. Now, let’s get to the actual numbers and program.

Jake is 24 years old, and his resting heart rate upon rising was 56 beats per minute (bpm). If we use the Karvonen Formula for maximum HR (takes into account age and resting HR) and apply our 60-70% for zone 2, we want him living in the 140-154bpm range for the duration of his session. As you can see from the chart below – which features HR readings at the end of every set during his session – he pretty much hovered in this zone the entire time. The only time he was a bit above it was during an “extended” warm-up where I added in some low-level plyo drills just to avoid completely detraining sprint work (he’d already had a few weeks off from baseball before starting up his off-season).

MobilityCircuitsHR

When all was said and done, Jake averaged 145bpm for the 38 minutes between the end of his warm-up and the completion of the session.

Graph1

He bumped up a little bit high in a few spots, but that’s easily remedied by adding in a slightly longer break between sets – or even just rearranging the pairings.

Graph2

To that last point, I should also note that this approach only works if an athlete is cognizant of not taking too long between sets. If he chats with his buddies and heart rate dips too much between "bouts," you're basically doing a lame interval session instead of something truly continuous. Jake did 44 sets of low-intensity work in 38 minutes. You can't get that much work in if you're taking time to tell a training partner about the cute thing your puppy did, or pondering your fantasy football roster.

Think about the implications of this....

What do you think this kind of approach could do for the foundation of movement quality for a typical high school, college, or professional pitching staff?

Don't you think it might make them more athletic, and even more capable of making mechanical changes easier?

Don't you think they'd be less injury-resistant performing an individualized mobility circuit instead of one-size-fits-all distance running?

Do you think that maybe, just maybe, they'd feel better after an 11-hour bus ride?

Don't you think they'd bounce back more quickly between outings?

Designing a low-intensity mobility circuit like this is not difficult. I have a ton of examples on my YouTube page and in products like Assess and Correct and The High Performance Handbook. Stuff like this works great:

What is difficult for some coaches, though, is admitting that distance running to "build up your legs" is like changing the tires on a car with no engine, or studying for the wrong test. Just because "that's how it's always been done" doesn't mean that's how it has to stay.

Give some of these a try in the early off-season - and even during the season in place of "flush runs." They'll be a big hit with your athletes both in terms of performance and health. 

And, for those of your looking for another Z2 training option, look no further.

Sign-up Today for our FREE Newsletter and receive a four-part video series on how to deadlift!

Name
Email
Read more
Page 1 2 3 4
LEARN HOW TO DEADLIFT
  • Avoid the most common deadlifting mistakes
  • 9 - minute instructional video
  • 3 part follow up series