Today's Exercise of the Week guest post comes from Lee Boyce.
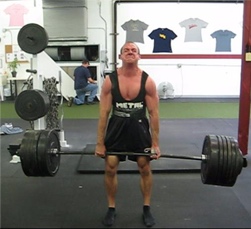
We all know the benefits of overhead pressing. As long as the shoulder girdle is in an acceptable position to handle them, they’re worth their weight in gold for health, strength, and mobility – when performed correctly. Many lifters and athletes find strength improvements on a typical standing overhead presses stall out because of the compensatory mechanisms that enter the lift as the loading increases. Specifically, poor core control can lend to an overarched position that causes much more lumbar spine stress than the exercise should ideally produce.
This usually becomes present to a certain degree, even with what most would consider “good form” when pressing. In the video below, I was quite happy with this technique, but nevertheless, a heavy press shows that some lumbar extension is unavoidable, despite plenty of pressing strength left in the tank.
The solution to this issue is simple. Instead of backing off on overhead pressing, a better idea would be to start training the lift by eliminating the lower body from the equation using the Z Press. This fixes the pelvic position and kills the chances for any shifting of the hips, thus locking the spine into a neutral position. There’s an added benefit to this. Using this setup makes it incredibly difficult to perform reps with poor form – if you lean back too far to compensate, you’ll lose balance since your feet aren’t planted. If you slouch, the bar will go straight down.
The Z Press asks for good mobility as a prerequisite. Trying a Z press may expose shoulder mobility issues a lifter wasn’t aware he had. For many, it’s difficult to load the bar over the spine at full lockout, while keeping the spine neutral. To get the bar to the proper position in space, the hips may drift forward, or the spine may extend.
One other benefit of the Z press is enforcing the correct rhythm to be used when performing reps of a standing barbell press. Knowing when to flare the elbows, and when to time the “head through” position is important. This timing is really put to the test with the Z Press since there’s no pelvic adjustment or leg drive that can be used to “save” the lift. For a live-action demonstration, check out the video below.
Coaching Cues
1. Set the pins in the squat cage just below shoulder level. There shouldn’t be more than 6 inches between where it rests and your starting position. That’ll make it easy to pick up and drop off while in position.
2. Set your feet according to your hip anatomy and mobility. A wider leg width may be good for someone with structural hip limitations, while those with stellar mobility will feel better with a narrower stance. Be sure the set-up you choose enables you to maintain a neutral spine position.
3. Remember to sit tall. Assume that your typical overhead pressing posture will be tough to pull off from a seated position with the legs in front of you. Overemphasize sitting tall, and you’ll be in the right place.
4. Once the bar clears the forehead, push your head and chest “through the window” as best you can. This will put the spine under the bar and load it correctly over the body. Achieve a full lockout at the top.
5. Don’t be afraid to let the elbows flare out in the final 1/3 of the movement.
6. Many people won’t have the mobility to maintain upright posture while sitting flat on the ground. To regress this movement, sit on a step platform or bumper plate to start. The slightly larger hip angle will help keep the spine upright. If you watch my video again, you’ll see I’m sitting on a 1” rubber mat, which is just what I need to perfect my form at this time. Your end goal should still be to reach the floor.
7. If you have shoulder issues barbell pressing, then feel free to modify this movement by performing it with a neutral grip and dumbbells.
8. Just because your lower body is out of the picture, it doesn’t mean the hips aren’t involved. The hip flexors usually work hard to stabilize the pelvis through the movement, and chances are they’ll feel worked and tight by the end of your workout. Release and stretch them before and after.
About the Author
Lee Boyce (@CoachLeeBoyce) is a strength coach, writer, and former collegiate level sprinter and long jumper. In 2013, he was named to the training and treatment staff for Team Jamaica at the Penn Relays. He’s regularly featured in the largest fitness publications as a writer. Visit his website at www.LeeBoyceTraining.com or check him out on Facebook.
Sign-up Today for our FREE Newsletter and receive a four-part video series on how to deadlift!
It's been a while since I posted an "Exercise of the Week," but hopefully today's offering will atone for that, as this is one of my favorite exercises to program in the late off-season period for our athletes. Check out the video below to learn how to deadlift using a trap bar and bands.
For more deadlift technique insights - including a nine-minute instructional video and three-part follow-up series, sign-up today for our FREE!
Barbell shrugs have been labeled a "meathead" exercise by a lot of people, but with some quick modifications, you can make them really valuable inclusions in a strength training program, as not all shrugging is created equal. Check out this exercise of the week video to learn more:
As I mentioned, if you're looking for another variation that's unloaded, try including wall slides with overhead shrug in your warm-ups; they are a great teaching tool.
Sign-up Today for our FREE Newsletter and receive a four-part video series on how to deadlift!
The squat is one of the most revered strength training exercises of all time, and the front squat is a popular variation on this compound lift. However, like many lifts, it's often performed incorrectly, and in many cases used by folks for whom it isn't a good fit. To that end, I thought I'd devote this article to outlining everything you need to know to be successful with the front squat.
What Makes the Front Squat Different?
A few primary factors differentiate a front squat from a traditional back squat.
First, the bar is positioned on the front of the shoulder girdle rather than on the upper back. In the process, an athlete is given a counterbalance to allow for a better posterior weight shift, which improves squat depth. If you need proof, check out your body weight squat, and then retest it while holding a ten-pound plate out at arm's length; most of you will improve substantially.
Second, because the arms are elevated (flexed humeri), the lats are lengthened. This is in contrast to the back squat, where the lats can be used to aggressively pull the bar down into the upper back and help create core stability. I firmly believe the lack of lat involvement is what accounts for the significant differences in loads one can handle in the front squat as compared to the back squat. However, "quieting down" the lats on the front squat is likely why athletes with such dramatic lordotic posture can often squat much deeper/cleaner with the front squat. Of course, if they have an excessive lordosis and anterior pelvic tilt, you may not want to squat them in the first place!
Third, the positioning of the bar in the front makes the front squat much more shoulder friendly than the back squat, assuming we aren't dealing with an acromioclavicular joint injury, which would be irritated by direct pressure of the bar. In the back squat, the externally rotated "rack" position poses problems for athletes with poor upper body mobility, and it actually reproduces injury mechanisms at the shoulder and elbow in overhead athletes like baseball players, tennis players, volleyball players, and swimmers.
Fourth, the upright torso angle of the front squat reduces shear stress on the spine. More forward lean equates to more shear stress, as the resistance is moved further away from the axis of rotation; just think of a see-saw where your lower back is the middle point and you'll catch my drift. Moving the load further out also increases risk of going into excessive lumbar flexion under compressive load. The front squat – even under heavier loads – keeps a lifter more upright, or else he’ll simply dump the bar; it's somewhat of a self-limiting strength exercise.
Fifth, because the load is positioned further forward than in a back squat, there isn't as much of a pre-stretch for the posterior chain, so the front squat will be more quad dominant than the back squat, which will engage more glutes and hamstrings. Of course, you can use front box squats to shuffle things up and get some variety, but we won't deviate from the point too much here.
Sixth, in the overwhelming majority of lifters, because of the upright torso angle and increased recruitment of quads relative to posterior chain, most lifters will use significantly less weight on the front squat than the back squat. All things considered, if you can achieve a comparable training effect with less external loading, you're dealing with what would generally be considered a safer exercise.
Contraindications
Some individuals simply aren't cut out for any kind of squatting, so before we even talk technique, it's important to start by separating these lifters out. Some common contraindications for squatting include poor tolerance to compressive loading (e.g., symptomatic lumbar spine disc injuries) and femoroacetabular impingement (this bony block at the hips makes it virtually impossible to squat without developing issues acutely and chronically).
Specific to front squatting, poor hip mobility, ankle mobility, core stability can be problematic, but perhaps nothing is as big of a buzzkill for front squatting as a kyphotic posture. As I demonstrate with my Quasimodo impression in this photo, it's impossible to get the elbows up when you're rounded over like a scared cat.
These are really just the tip of the iceberg in terms of potential contraindications, but they serve as examples of how we need to fit the exercise to the lifter and not vice versa. With that out of the way, let's talk...
Technique!
We'll start with the hand positioning, as it's the most hotly contested portion of the front squat technique debate. Only a video will do it justice:
When it comes time to unrack the bar, I cue the athlete to push the elbows up high and take air into the belly as they stand up the weight. This combination of "elbows up" (shoulder flexion) and "air in" prevents the bar from rolling - either because the arms are angled down or because the torso goes to mush as the rib cage comes down.
After the weight is walked out, the athlete should take a slightly outside hip width stance, with the toes angled slightly out. One of the biggest mistakes I see is that athletes go too wide with their stance, and the end result is that the knees have nowhere to go but in:
To piggyback on the "feet in, knees out" cue, I encourage athletes to think of "squatting between the knees, not over them." This seems to get folks to the right balance of "sit back" and "sit down," as an (Olympic) front squat will have more "sit down" than a back squat or box squat variation. Additionally, a regular back squat will be slightly wider in stance than a front squat for most folks, and a box squat will certainly be even wider.
"Elbows up" is a cue that resounds throughout the movement, and it's especially important in the bottom position, when the bar will want to roll the most. Regardless of the hand position you select, make sure the elbows are at or above the level of the bar at all times. One great drill for practicing is to simply unrack the bar hands-free and gradually build up loads. If you can get comfortable with this set-up, you'll always remember to think "elbows" and not "hands."
As you come out of the hole and accelerate toward lockout, make sure you don't get lazy as you enter the easy portion of the strength curve. This is where front squatting with chains can be very helpful; it educates you on how to accelerate right up to lockout, where the hips and knees extend fully simultaneously. If you don't have chains, try loading the last ten pounds of weight as 2.5-pound weights (two on each side). Position the clamp about an inch further out than it would normally be so that they can "clank" a bit. Your goal is to make the 2.5-pound plates rattle at the top of each rep. Finish with the glutes as you stand tall, and reset your breath before descending for subsequent reps.
Speaking of reps, stay away from doing high-rep front squats. Sets of six should be the maximum you do, as muscles involved in maintaining the "rack" position may fatigue early and compromise the safety of the exercise.
Equipment Considerations
There are three important equipment considers to take into account.
First, your shoes should have a subtle heel lift. It doesn't have to be an Olympic lifting shoe, but something that is totally flat to the ground won't work for the majority of folks. It'll take some tremendous ankle mobility to squat deep without a little lift - even if it's only a few millimeters. Front squatting (assuming an upright, Olympic stance) barefoot is probably not a great idea; I can count on one hand the number of people I've seen do it in good technique in the past 4-5 years since the barefoot craze took off. Minimalist shoes are fantastic, but not necessarily for deep, Olympic-style squatting. If you're rocking a Minimalist sneaker, you can always slide a five-pound plate under the heel.
Second, be careful with shirts made of "wicking" fabric. While they may be super comfortable, they do tend to allow the bar to slide a bit too much, especially if you're using a bar that doesn't have much knurling. A quick solution to this is to spread some lifting chalk around the collar and chest to help the bar grab the shirt a bit more - or you could just wear a different shirt.
Third, many front squat newbies will really struggle with the discomfort of the bar position as they're learning to the bar-in-front technique. While everyone ultimately adjusts to this discomfort (especially if they add some muscle mass to the area), one strategy to help athletes get by in the short-term is to just have them wear two shirts while they front squat. This extra layer of padding is subtle and won't change the technique of the exercise, but will make it more tolerable during the learning phase. You can taper an athlete off of it shortly thereafter.
Closing Thoughts
Squats aren't for everyone, but if you are going to squat, the front squat is one great option. Put these coaching cues and strategies into action, and you'll be front squatting safely and moving big weights in no time.
Looking for more detailed training tutorials like this, and a program in which front squatting is incorporated? Check out The High Performance Handbook, the most versatile strength and conditioning program on the market.
Sign-up Today for our FREE Newsletter and receive a four-part video series on how to deadlift!
When it comes to strength training programs, the basics work. They always have, and they almost always will. However, sometimes, they don't. The more advanced you get, the more often you'll need to shake things up to ensure continued progress.
Sometimes this is as simple as taking a deload week, changing your exercise selection, undertaking a specialization program, or bringing in a hype guy to pad your ego.
With that in mind, I thought I'd use today's post to introduce a way you can integrate some variety in your strength training programs to avoid plateaus and keep things interesting. That strategy is to go concentric-only. Let me explain.
The eccentric (lowering) portion of each rep is what causes the most muscular damage and post-exercise soreness. A common deloading strategy that many lifters have employed is to reduce the amount of eccentric work in a strength training program, instead utilizing concentric-only (or predominantly concentric) lifts. These strength exercises include deadlifts (uncontrolled eccentric or dropping the weight), high pulls, step-ups, sled pushing/dragging, and Anderson squats. Have a look at this video and let me know how much eccentric work I actually did:
Then, consider that a step-up variation under load allows a lifter to attain some of the benefits of single-leg training without all of the debilitating soreness one feels when sitting down to the toilet for the 3-4 days following walking lunges.
And, consider sled pushing. It might make you hate life and lose your lunch, but it won't make you sore.
What folks might not consider is that this doesn't just have to be a deloading strategy; it can also be a loading strategy. It goes without saying that if you are employing more concentric-only exercises, you can train more frequently. So, for those of you who are considering squatting or deadliting 3x/week in a specialization block, you might consider getting more concentric-only work in so that you can still groove movement patterns and load considerably, but without the same degree of tissue-specific damage.
Utilizing more concentric-only variations can also be very helpful with in-season athletes when you want to avoid soreness at all costs, as I wrote here. However, it's important to note that this is not a long-term training strategy. Rather, it should be a short-term change of pace, as eccentric control is tremendously important for athletes and fitness enthusiasts alike. Experiencing eccentric stress is crucial to prevent injuries, performing at a high level, and building muscle mass. Nonetheless, start thinking about how some concentric-only work might help to take your strength training programs to the next level.
Here's this week's list of recommended strength and conditioning reading:
Elite Training Mentorship - In this month's update, I contributed two exercise demonstrations, an article, and two in-services. The in-services were "What is the Sports Hernia?" and "Arm Injury Mechanisms in Throwing Athletes." This latest update also featured some great contributions from Tyler English.
Hudson Training Facility Expands Footprint, Market - This was a story in the local newspaper about the expansion of Cressey Performance, which gives rise to a new offering (morning bootcamps) in our business model. If you're in our area, definitely check it out.
The HRV Roundtable - I thought this was an excellent article at T-Nation, as it draws on the experience of a number of very bright guys in the industry to highlight some forward-thinking concepts.
Sign-up Today for our FREE Newsletter and receive a four-part video series on how to deadlift!
It's that time of the week again: Greg Robins is here to throw some tips your way to lose fat, gain muscle, get strong, and take over the world. It's also quite fitting that Greg be our guest contributor on 9/11 in light of his military background. With that in mind, for every Tweet or Facebook Share (both can be done in the top left of this page) this post gets by the end of the day on Wednesday, I'll donate $0.10 to the Wounded Warrior Project. Thank you very much to all of you who have served our country.
Now, on to Greg's tips...
1. Be careful not to pair competing exercises.
When you set up your own strength training programs, exercise selection is the most commonly recognized variable; they think about it before they consider a number of other factors. I often advise people to look deeper than simply the strength exercises they are choosing. Instead, many would be better served to evaluate things like sets and reps schemes and total volume week to week while keeping the same movements in their approach longer. This aside, strength exercise selection must be considered at some point, and one rookie mistake is pairing two exercises that directly compete against one another.
Exercises may compete in a variety of ways. For example, pairing two exercises that are heavily grip dependent, such as rows and dumbbell lunges, provides an unneeded challenge to maintain grip strength. A better suggestion would be to keep the rows, but go to a single-leg exercise that doesn't require as much grip work:
Another common example is pairing prone bridge variations with pushing exercises, as the shoulder fatigue will often take away from the ability to maintain good posture in the prone bridge. Take a look at how you have set up your strength and conditioning programs and eliminate pairings that do not allow you to give a full effort to each exercise. It’s easily fixed by subbing in exercise pairings that are direct opposites (e.g., rows with presses) or by pairing strength exercises with mobility drills.
2. Choose jumps and throws wisely for those with elbow and knee pain.
I am an advocate of placing a small amount of “explosive” training at the beginning of both competitive athletes and general fitness clients' programs. Performing an explosive movement prior to resistance training helps to prime the nervous system for the day's training. Additionally, it helps mentally gear people up to lift heavy stuff!
However, many people deal with nagging elbow and knee pain, which can be problematic when coupled with many of the common exercises utilized in this capacity. In some cases, a person may need to forgo these types of movements altogether while we work to alleviate the causes of such problems. For many, though, explosive movements can still be incorporated if appropriate exercises are selected. Limit jumping variations to those with the least amount of deceleration. Work with low level box jumps, and avoid options like broad jumps and depth jump variations. Another great option is to utilize jumps up an inclined surface, like a hill. Furthermore, kettlebell swings present us with an excellent joint friendly option to work the lower extremities in a low impact, explosive fashion.
Lastly, medicine ball exercises can present problems for those with elbow pain. When presented with these issues, stick to throws that do not call for violent extension of the elbow joint. These include overhead stomps done with straight arms, overhead throws done the same way, and scoop toss variations with a strict attention to keeping the arms generally straight.
3. Examine your protein supplements closely.
With the recent popularity in protein supplementation, it’s no shock that everyone is trying to make a quick buck off those looking to pack in more protein. It wasn’t too long ago that you had to seek out an actual nutrition store to purchase products like “ready to drink” protein shakes. Nowadays you can find these at pretty much any convenience store, or gas station mini mart. Furthermore, there was also a time that you could count the manufacturers of protein supplements on one hand, or two at the most. Most of them tasted like cardboard, and you needed an industrial blender to try and make that stuff into something resembling liquid. This has obviously changed - some for the better, and some for the worse. Before picking up your next tub of powdered goodness, take a look at the ingredients. In a similar fashion to what we discussed a few weeks back with food labels: the flashy front promises are often hiding a less than impressive host of ingredients on the back.
First, look at what type of protein you’re getting. Whey is not whey, is not whey, is not whey. Cheaper products are predominantly whey concentrate which is of lesser quality than whey isolate, or the more rapidly usable hydrosylate. It also tends to be harder to mix. Furthermore, if it isn't whey, what's the protein source? Is it soy, milk, egg, hemp, pea, or unicorn blood? Next, how are they making this stuff taste so darn good? Check for added sugar, and the use of artificial sweeteners. Lastly, be weary of the ready-to-drink variations; they are most likely full of chemicals, preservatives, and other things my high school chemistry curriculum failed to cover.
There are definitely reliable sources of protein supplements out there, though. I like to mix up the companies I use, and also the sources. I realize you could get pretty scientific about what works best and when, but I have other things to do. Mixing the source, and attaining them from quality places have served me well; I advise you do the same!
4. Layer up to beat the cold.
Fall is here in New England, and that means the cold weather is almost upon us. I have something to confess: I sweat on an absurd level. Needless to say, fall is a nice change of pace for me. I can wear a color other than black on a date, and I don’t have to buy nearly as much deodorant.
While my perspiration woes are a menace to my social life, I like being sweaty in the gym. As it gets cooler, I wear sweats and spandex or compression pants, shirts and sleeves. Plus, it seems like the perfect time to have an excuse to wear a beanie while training and not look like I am trying to just be a total badass. Do note, however, that I am perfectly okay with wearing anything that makes you feel badass, anytime.
As an aside, though, Cressey Performance does sell beanies; you can buy one online HERE.
It’s more than just a personal preference, though; it will help improve your training quality. Warm joints and muscles are happy joints and muscles. To take it a step further, warm people are happier people too - and that makes them far more motivated to train. Keep this in mind when leaving the house to train. Take a hot shower, layer up, warm up the car, and take any other preventative measures needed to prevent you from entering cold weather hibernation. Your training quality will stay up, and your consistency will continue.
5. Think twice about implementing icing for post-training recovery.
Icing has become a common prescription to help aid recovery of sore muscles. The research has always been less than stellar as to the actual merits of its application, though. Still, ice baths, bags of ice, and cooling packs have been a staple in gyms and training rooms across the country. And, if people are doing it, and claiming it helps them, then why not do it? There are, of course, different ways to use ice. Are we treating inflammation, or muscular soreness?
A recent study published in The Journal of Strength and Conditioning Research found that icing actually reduced recovery from eccentric exercise induced muscular damage. Participants were given cooling packs for the associated muscles affected by a controlled exercise. The pack was applied at various times for 15m in duration, post-training. The group who was given the cooling treatment did not improve recovery; in fact, it delayed the recovery process in comparison to the group who was not. Given this information, people should place a premium on other modalities to improve recovery. These include soft tissue work, compression, and low level activity in the 24-48 hour period following eccentric exercise.
There still may be some merits to icing in certain situations, so be careful to discard this modality altogether. However, it's clear that more research is needed to determine if/when it should be used. For additional reading along these lines, I'd encourage you to check out Kelly Starret's recent blog post, People, We've Got to Stop Icing.
Sign-up Today for our FREE Newsletter and receive a four-part video series on how to deadlift!
This week's strength exercise is one I learned from Dave Schmitz of ResistanceBandTraining.com. Dave's the "go-to" guy out there when it comes to training with resistance bands, and he has a knack for coming up with innovative exercises with minimal equipment. This is one such example that we've been utilizing more and more in the strength and conditioning programs we write.
The beauty of the weight shift is that it adds an extensive decelerative component to the exercise and allows us to integrate scapular control in whole body movement the way it occurs in athletics. It also allows us to get a better training effect with less resistance.
I like utilizing this with our pitchers because it educates them on how to "get long" out front (improve trunk tilt at ball release) and stiffen up on the front leg at the right time. The eccentric overload created by the band serves as a good reminder to not get lazy and go to mush on the front side.
This can also be utilized in group training settings when you want a compound exercise that folks of many different strength levels can utilize. Simply stepping closer to the band attachment point can reduce the resistance and make it appropriate for a weaker participant without having to change the load.
The exercise can be done with a cable as well, but I just don't think that the weight shift component works quite as smoothly in the cable scenario.
In terms of progressions, we typically teach the standing 1-arm cable row first to all our clients and athletes, as it educates them on proper interaction of the scapula and humerus during rowing. This is an exercise we'd consider adding into strength and conditioning programs after the first 4-8 weeks of working with a client. It's usually done either first in the training session as a power exercise, or later in the session for higher reps.
Give it a shot!
Also, if you're interested in checking out more of Dave's innovative exercises, be sure to visit EliteTrainingMentorship.com, as he's one of my co-contributors to the site and adds great content each month.
Sign-up Today for our FREE Newsletter and receive a four-part video series on how to deadlift!
Here are some strength and conditioning and nutrition tips to help you lose fat, gain muscle, get strong, and scare obnoxious kids off your lawn, compliments of Cressey Performance coach, Greg Robins.
1. If you're going to use kettlebells, hold them correctly:
2. There's "strong," and there is "strong enough."
In our strength and conditioning programs, we focus on the improvement of three main strength qualities: maximal strength, explosive strength, and reactive strength. Strength is basically the ability to produce force. Potential force finds its ways into different equations that represent qualities executed on the field, court, diamond, ice, etc.
I look at maximal strength as a pool of potential force that can be called upon, while explosive and reactive strength are a measure of how efficiently and quickly this potential force can be utilized. At a certain point, improving one strength quality without another is a futile effort. The amount of each quality can be determined by the demands of the athlete's sport, and position within that sport; how does the athlete need to move themselves, or someone or something else?
At a certain point the continued increase of maximal strength at the disproportionate increase of explosive and reactive strength is not productive. In other words, how beneficial is it to take a pitcher's squat from 315lbs to 405lbs when he is asked to throw a baseball that weighs about 5 ounces? Do not get wrapped up in maximal strength numbers, be weary of assigning arbitrary numbers as benchmarks for your athletes, and make sure to train different qualities in a strength training program.
3. We were given two legs and two arms, don't forget to use them together.
I am not dismissing unilateral work from a solid strength and conditioning program. I am offering that the dismissal of bilateral exercises, injury cases/movement issues withstanding, is not necessary. In fact, I would argue that it is detrimental to your purpose.
Strength coaches often use the analogy that "weight lifting is not your sport", and I have written on this forum on how the only necessary activity to an athlete is actual sport practice. As coaches, and everyday people, we all know the last thing we want to do is get hurt in the weight room. So if weight lifting is an added benefit to sport performance, and not used to replicate the sport itself, why is uni lateral work considered more functional to our goal? Additionally, if the idea is to keep people healthy, why would we not use the best mechanical positions to move heavy loads in our strength training programs?
I realize an argument can be made for unilateral work in both of these cases, and thus I am not saying it shouldn't be included; rather it shouldn't be included at the expense of bilateral work. Instead of looking for ways bilateral lifts aren't great choices, you are better served to look at how they are, and then find ways around their shortcomings. This is what we do at CP, via specialty bars, elevated trap bar settings, and so forth. Do yourself and your athletes a favor and include bilateral exercise selections in your strength training programs; they are safe, effective, and very "functional".
4. When squatting, create outward pressure from the heel.
When I teach someone how to squat I am careful in how I cue pressure on the foot. I like people to imagine "spreading" when going down AND when coming up in the squat. However, I find that when you tell someone to spread they will often supinate and lose a neutral position of the ankle.
The good news is that this cleans up when you tell them (or yourself) to create outward pressure on the heel. In this position the ankle joint will remain centered, and you will produce better force through the ground. Make sure to keep contact with the ground with the front of your foot as well. The two points of contact there will be just below the big and little toe. This creates the "tri-pod" effect and gives you power through the lateral heel and control through the front foot. Give it a try and watch your squat improve right away!
Additionally, think about what this means in the context of your footwear selection. If you've got a huge heel lift, there is no way you'll be able to get the appropriate weight positioning through your feet. That's why a minimalist footwear option is a better bet for performing various strength exercises (and just about everything in life).
5. Cue up some music; it helps!
I don't know about you, but I love to have some great music on when I train. I honestly prefer to listen to music I actually enjoy when training, not always something that just makes me want to put my head through a wall. Furthermore, it has actually been shown that music does improve performance in activities requiring high muscle outputs.
A recent study published in the International Journal of Sports Medicine found that music actually improves muscle power output.
"...peak and mean power were significantly higher after music than no music warm-up during the two times of testing. Thus, as it is a legal method and an additional aid, music should be used during warm-up before performing activities requiring powerful lower limbs' muscles contractions, especially in the morning..."
While external sources of motivation should not be relied upon, make it a point to charge the iPod the night before big training sessions. It actually WILL make your strength and conditioning programs more successful!
My top five favorites on the playlist these days include Rage Against The Machine, Skrillex, Metallica, Jedi Mind Tricks, and "Call Me Maybe" by Carly Rae Jepsen. Yes, I went there.
What are your favorites? Leave a comment below!
Sign-up Today for our FREE Newsletter and receive a four-part video series on how to deadlift!
In a posta while back, I made a comment that intrigued quite a few people:
I've always been amazed at how much volume it takes to attain a level of fitness, but how little volume it takes to maintain that level of fitness.
If you train yourself to run a six-minute mile, then take two months off from running, you can usually come back and get pretty darn close to that same time in spite of the detraining. However, chance are that you had to bust your butt to get to that six-minute time in the first place.
The same can be said of a 600-pound deadlift, appreciate level of mobility, or world-ranking in water chugging.
In short, once you've hit these milestones, they stick around pretty well, provided you don't completely screw up and allow yourself to detrain. As a frame of reference, my best deadlift is 660, yet even though I don't pull over 600 all that frequently (my competitive powerlifting days are likely over), I know I can do so just about any day of the week.
I'm always amazed at where my strength levels stand at the end of a long baseball off-season. I work some absurdly long hours from September through February when all our professional baseball players are around - and this definitely impacts how frequently I do much work in the 1-3 rep range with my lower body training. And, frankly, I don't squat at all during this time of year because my knees are usually cranky from being on the hard floors all day. Interestingly enough, when I get some down-time when the pro guys go in-season, my squatting numbers haven't fallen off much at all.
I don't just think this is a valuable lesson for lifters who anticipate life interfering with optimal training dedication; I also think it's a tremendously important message to older lifters who may not be able to load as frequently as they could in their younger years. To that end, here are some strategies for sustaining the strength one has built up over the years.
Nothing every sapped my strength more than losing five pounds. Maybe I was just hyper-sensitive to it because I competed at a lower weight class and always had to monitory my weight to the point of being neurotic, or maybe it was just because it slightly changed my range-of-motion and leverages on the squat and bench press. Regardless of what it was, a five pound drop in body weight equated to a 30-pound drop off my squat and 15-pound drop off my bench.
To that end, if you're trying to keep your strength up during some down time in your strength training program, make sure to keep your weight up, too. It's not the time to be skimping on calories (unless, of course, you have a lot of fat to lose as part of your fitness goals).
2. Eat right.
"Eating enough" and "eating right" are two completely different things. It would be very easy for me to just live on fast food during our busiest season. Instead, I still set aside time to prepare food for the long work day. I'm also fortunate to have a cafeteria 100 feet down the hallway, and they'll cook me up whatever healthy food I need on the fly. I've got Athletic Greens, fish oil, and probiotics in my office, plus beef jerky and almonds in case I need solid food on the fly. "Busy" doesn't have to mean "unhealthy" as long as you plan ahead.
3. Lift heavy at least once a month.
If you want to get strong, you need to put in at least 2-3 heavy lifting sessions per month for the lift in question. And, if you're trying to trying to bring up a bench press, squat, deadlift, and chin-up simultaneously, you've got a lot of competing demands and overall training stress.
If, however, you want to stay strong, getting in just a few heavy sets of a particular movement each month can get the job done.
4. Get sufficient sleep.
No matter how busy life gets, I am pretty good about getting at least seven hours of sleep each night - and usually a little bit more. I'm typically in bed by 10PM and asleep by 10:30, then wake up between 6 and 7AM each day. I (like many others) have noticed that sleep before midnight makes me feel a lot better than trying to catch up by sleeping in the following morning.
5. Forget the deloads.
I'm a huge advocate of deloading periods in one's training; in fact, I wrote an entire e-book about the topic!
However, if you're going through a time when your normal training volume is compromised, you really aren't "loading" enough to require a deload. You're better off getting in your work whenever possible.
The obviously exception to this rule would be older lifters with appreciable levels of strength; they need to set aside specific deloading periods even if they are training with heavier sets less frequently.
6. Still crush your assistance work.
Just because you're not feeling up to crushing a personal best squat doesn't mean that you can't still get after it with your single-leg work, sled pushing, glute-ham raises, or any of a number of other assistance exercises. Do your best to keep the resistance up on your assistance work instead of just getting your reps in. Sets in the 5-8 rep range are outstanding in this regard, as they're heavy enough to have strength benefits, and the volume can help keep muscle on you, too.
If you maintain your strength on compound movements (e.g., chin-ups), you'll maintain your strength on "sub-category" isolation movements (e.g., biceps curls) just fine. It doesn't work the other way around, though.
If life is busy and you're dragging when you get to the gym, you're much better off hitting a set of deadlifts than you are doing some leg curls.
8. Consider rearranging your schedule or changing your strength training program split.
One of the biggest appeals of The High Performance Handbook I introduced was the versatility it provided via its 2x/week, 3x/week, and 4x/week strength training program options. Being able to shift from one approach to another as your schedule gets busier or lighter is valuable flexibility.
Additionally, it may be advantageous to plan your training for your less stressful days. If you work crazy hours Monday through Friday, try lifting Saturday and Sunday, then picking 1-2 days in the middle of the week for short sessions consisting of just assistance work.
These are eight strategies you can easily apply even when life isn't easy and you want to maintain strength, but there are surely many more - some of which you'll accidentally discover over the course of decades in the gym.
Sign-up Today for our FREE Newsletter and receive a four-part video series on how to deadlift!